
Connect ValueCore to Claude Desktop: MCP Connection Guide
1. Overview
Audience Personal accounts and Team and Enterprise organizations
Connect ValueCore to Claude Desktop to find business cases, inspect inputs, and prepare deliverables. Personal users complete Steps 1–4, then skip the organization-only sections and continue at Step 5 in Authorize your ValueCore account. Team and Enterprise Owners begin with Organization setup; members begin with Member connection and organization verification after the Owner adds ValueCore.
This guide uses a remote custom connector in Claude Desktop. No local server process or desktop JSON configuration file is needed for this connection.
ValueCore calls an individual ROI business case a visualizer. Your connection acts as the ValueCore user who signs in; existing visualizers are limited to that user’s own records.
2. Before you start
Have an active ValueCore user account and access to the intended Claude account or organization. Organization Owners add the connector; members authenticate separately. A personal ValueCore token still represents your individual user inside your company’s ValueCore organization.
Claude Free supports one custom connector. If that slot is already occupied, review your existing connector and plan options before adding ValueCore. Pro, Max, Team, and Enterprise also support remote custom connectors.
| Setting | Value |
|---|---|
| Connector name | ValueCore |
| Remote MCP server URL | https://api.visualize-roi.com/mcp/sse |
| Sign in | ValueCore authorization using your own account |
Step 1: Open Connectors in a personal account
For a personal Claude account, open Customize > Connectors and select Add or Add custom connector. Use an existing ValueCore entry if present. Team and Enterprise members should use the Organization setup section instead of adding a personal connector.
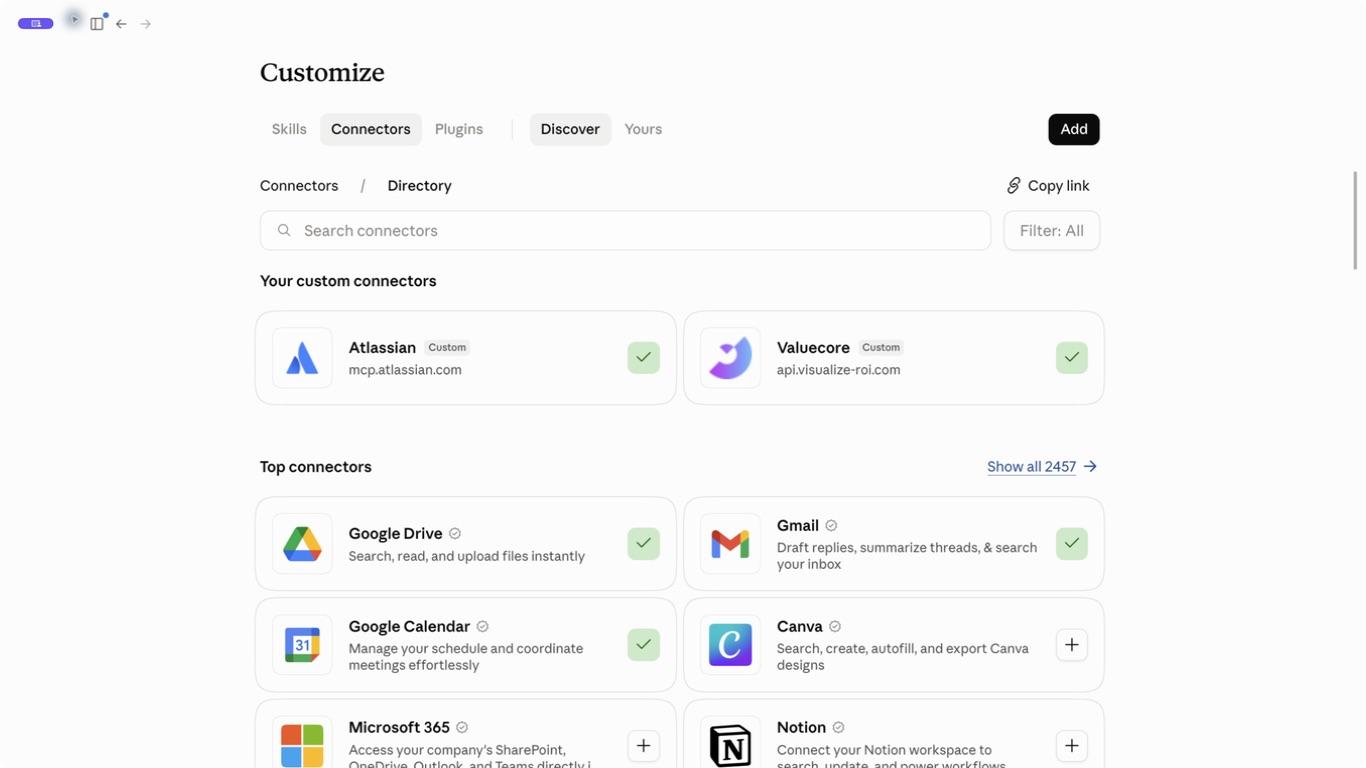
Figure 1. Personal Claude account connector directory. Organization Owners use Organization settings instead.
3. Add the server to a personal Claude account
Step 2: Enter the name and server URL
Enter ValueCore in Name. Paste the complete remote MCP server URL shown below into Remote MCP server URL. Keep /mcp/sse at the end of the address.
https://api.visualize-roi.com/mcp/sse
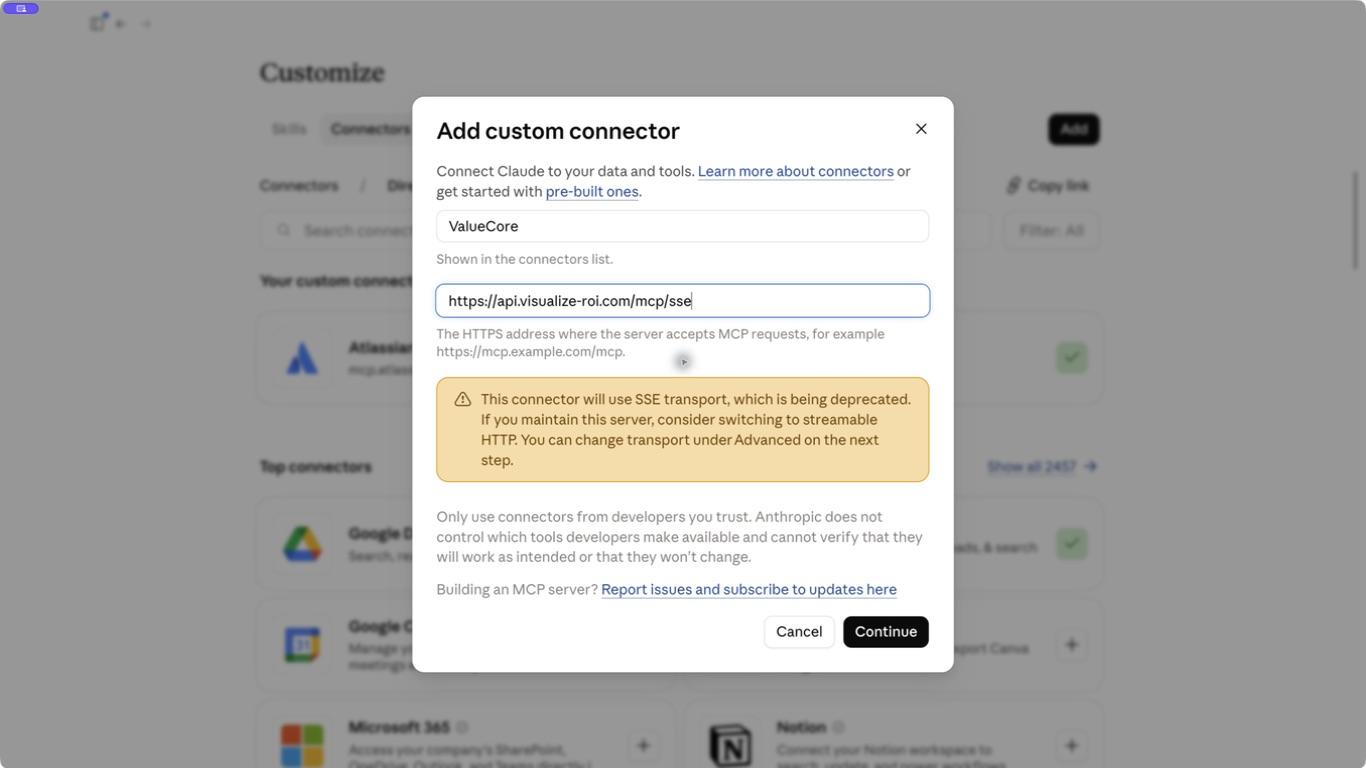
Figure 2. Personal connector form. The company administrator walkthrough follows in Organization setup.
Step 3: Review the transport setting
Select Continue. Claude may infer legacy SSE from the URL suffix and show a deprecation notice. ValueCore supports Streamable HTTP and legacy SSE at this same URL. If the next screen offers Advanced transport settings, choose Streamable HTTP; do not remove /sse from the URL.
Step 4: Finish adding the connector
Complete the connector setup and choose Connect when offered. ValueCore supports automatic OAuth client registration, so a separately supplied OAuth Client ID or Client Secret is not normally needed. If Claude reports that the URL already exists, cancel and open the existing ValueCore connector. Personal users: continue at Step 5 in Authorize your ValueCore account; skip the organization-only walkthrough.
4. Organization setup for Team and Enterprise
Complete this section in your company’s Claude organization. Adding a connector makes it available there; it does not provide a shared ValueCore identity or give members access to every business case.
Owner step 1: Select the organization
Sign in with your work account and select the intended Claude organization. Use an Owner or Primary Owner account. If organization settings are unavailable in Desktop, open the same organization in Claude on the web.
Owner step 2: Add the remote connector
Open Organization settings > Connectors. Search for ValueCore and check the server URL before adding anything. If the correct connector already exists, open it and continue with access review. Otherwise choose Add connector > Custom > Web and enter ValueCore as the name and the server URL below.
https://api.visualize-roi.com/mcp/sse
Choose Continue. Under Advanced, choose Streamable HTTP if a transport selector is shown. Keep the full /mcp/sse URL. Leave optional OAuth client credentials blank, then complete Add. Figures 3 and 4 illustrate this same setup; do not add a second connector.
Owner step 3: Review member access
Open the connector and review Tool permission restrictions. Set the default and individual tool restrictions to match company policy; members can choose stricter permissions. On Enterprise, also review Organization settings > Roles and the connector access assigned to the relevant roles.
Owner step 4: Hand off to members
Give members the connector name and the name of the Claude organization to select. Ask them to follow Member connection and organization verification after the illustrated walkthrough. Do not distribute the Owner’s ValueCore credentials or token.
Learn more: Anthropic setup instructions
Learn more: Anthropic Enterprise role controls
5. Company connector setup: illustrated reference
Figure 3 illustrates Owner step 2; it is not an additional setup step. If you have already added ValueCore, open that existing entry. When adding it for the first time, use Organization settings > Connectors > Add > Custom > Web, enter the approved name and full server URL, then select Continue.
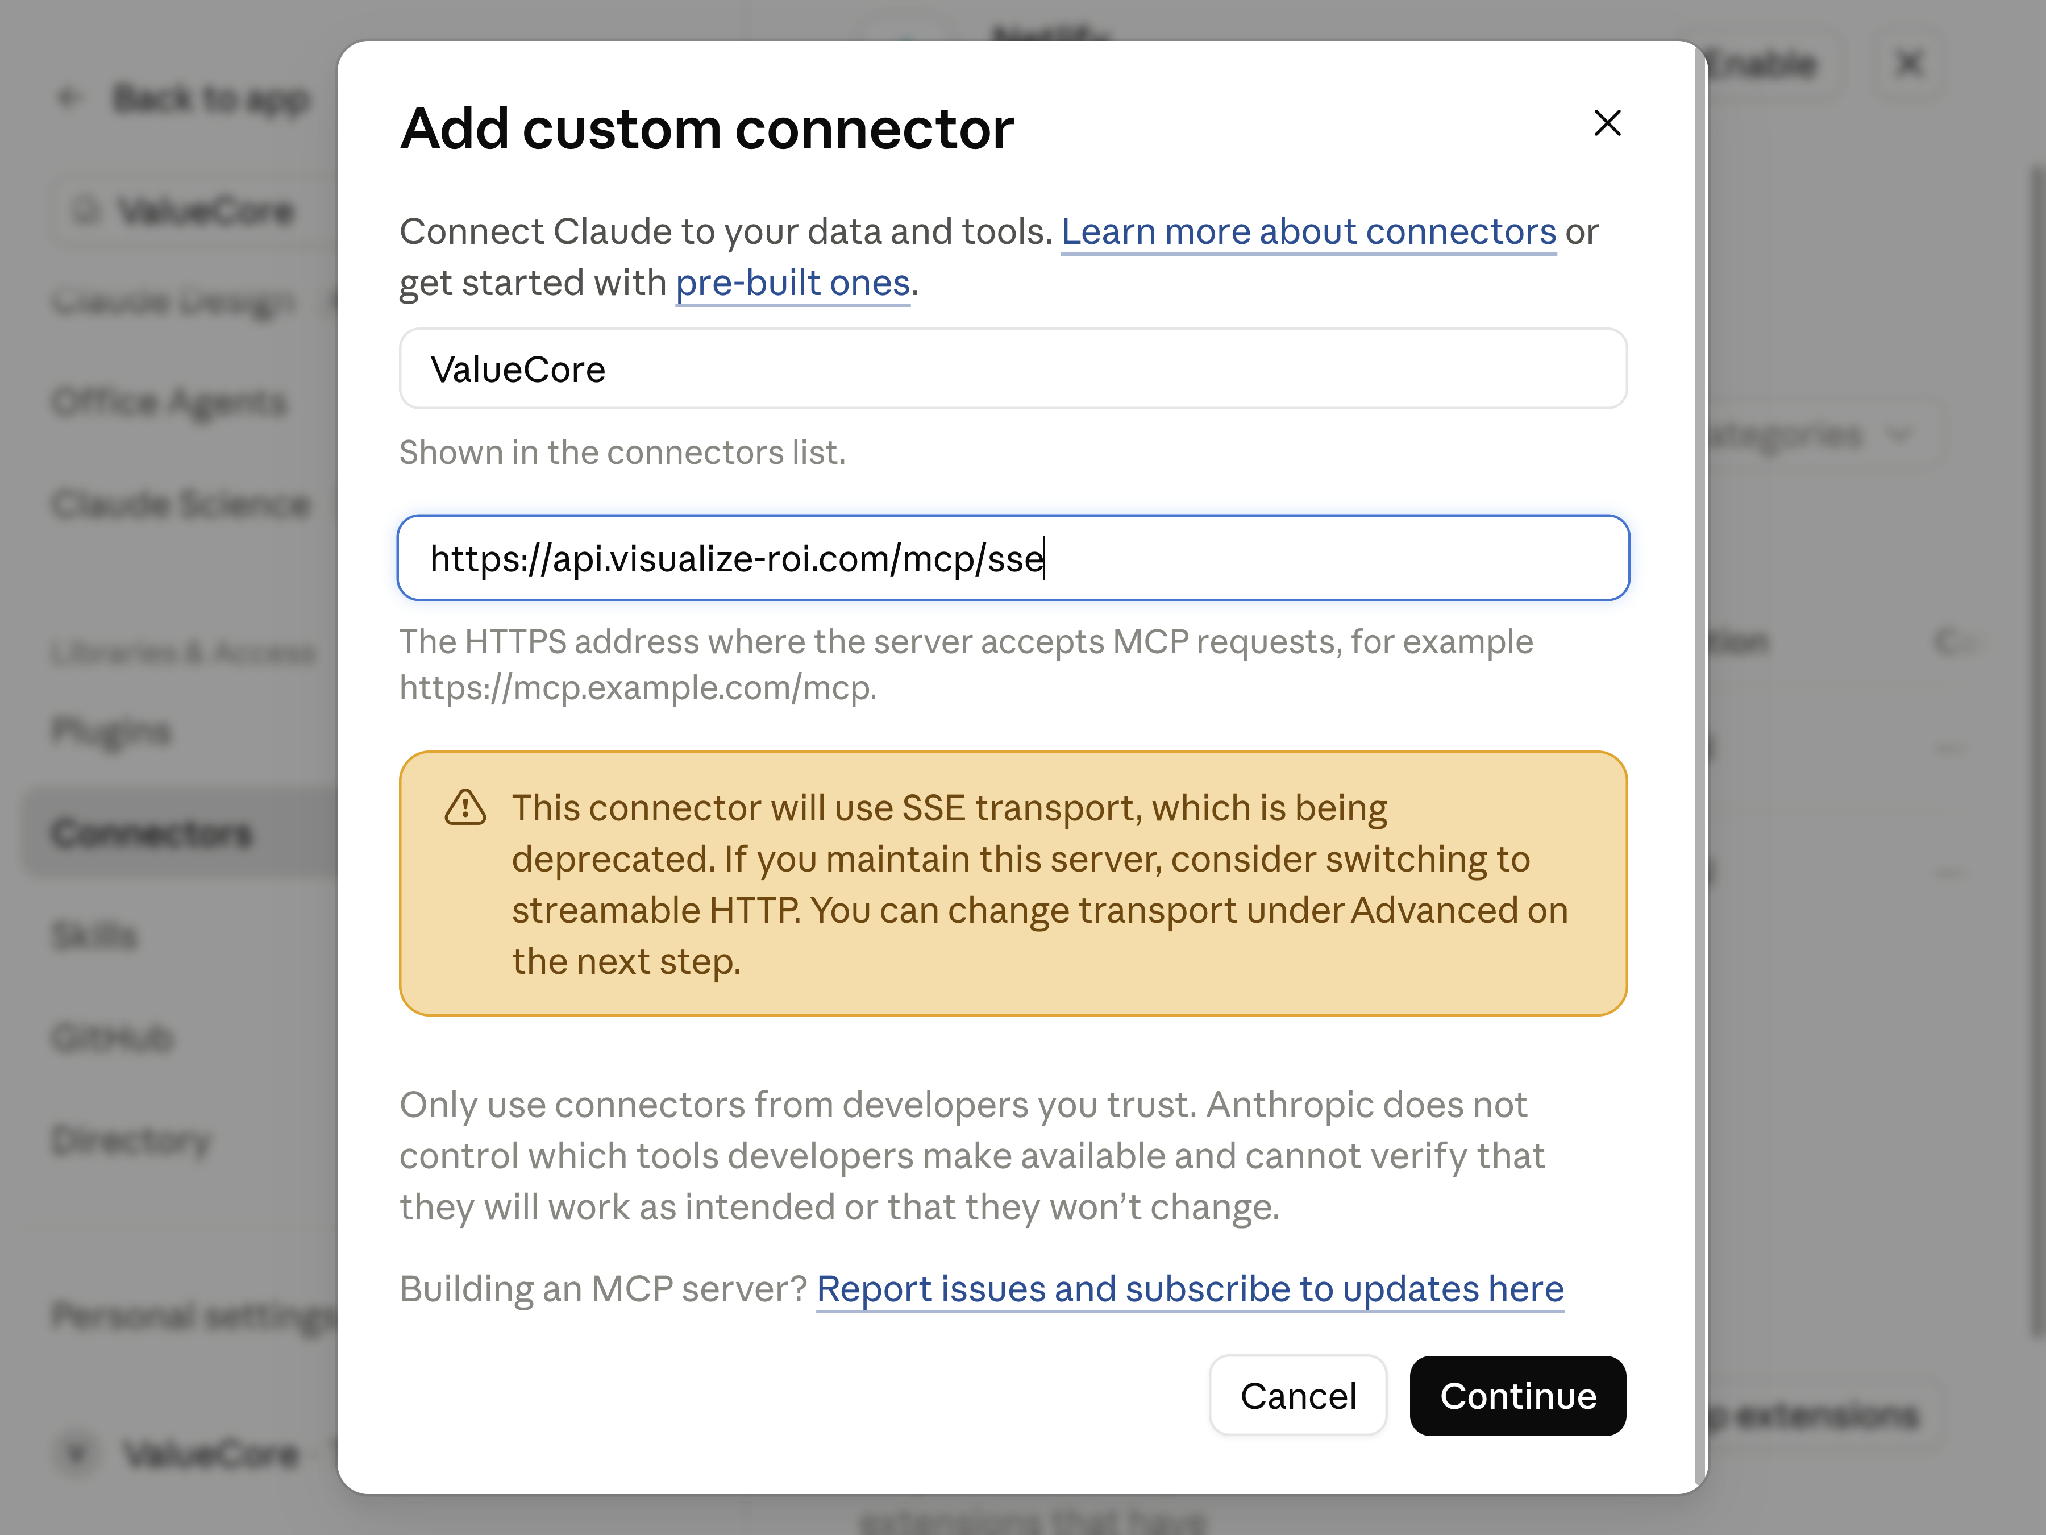
Figure 3. Custom web connector form in a Claude Team organization.
In the next screen, open Advanced and choose Streamable HTTP if offered. Keep /mcp/sse in the server URL. If no transport selector is shown, finish setup and verify the connection. A duplicate-URL message means you should cancel this form and open the existing entry.
6. Review company authentication
Open the existing ValueCore connector details and confirm the production server URL. Browser sign-in means every employee authorizes their own ValueCore account.
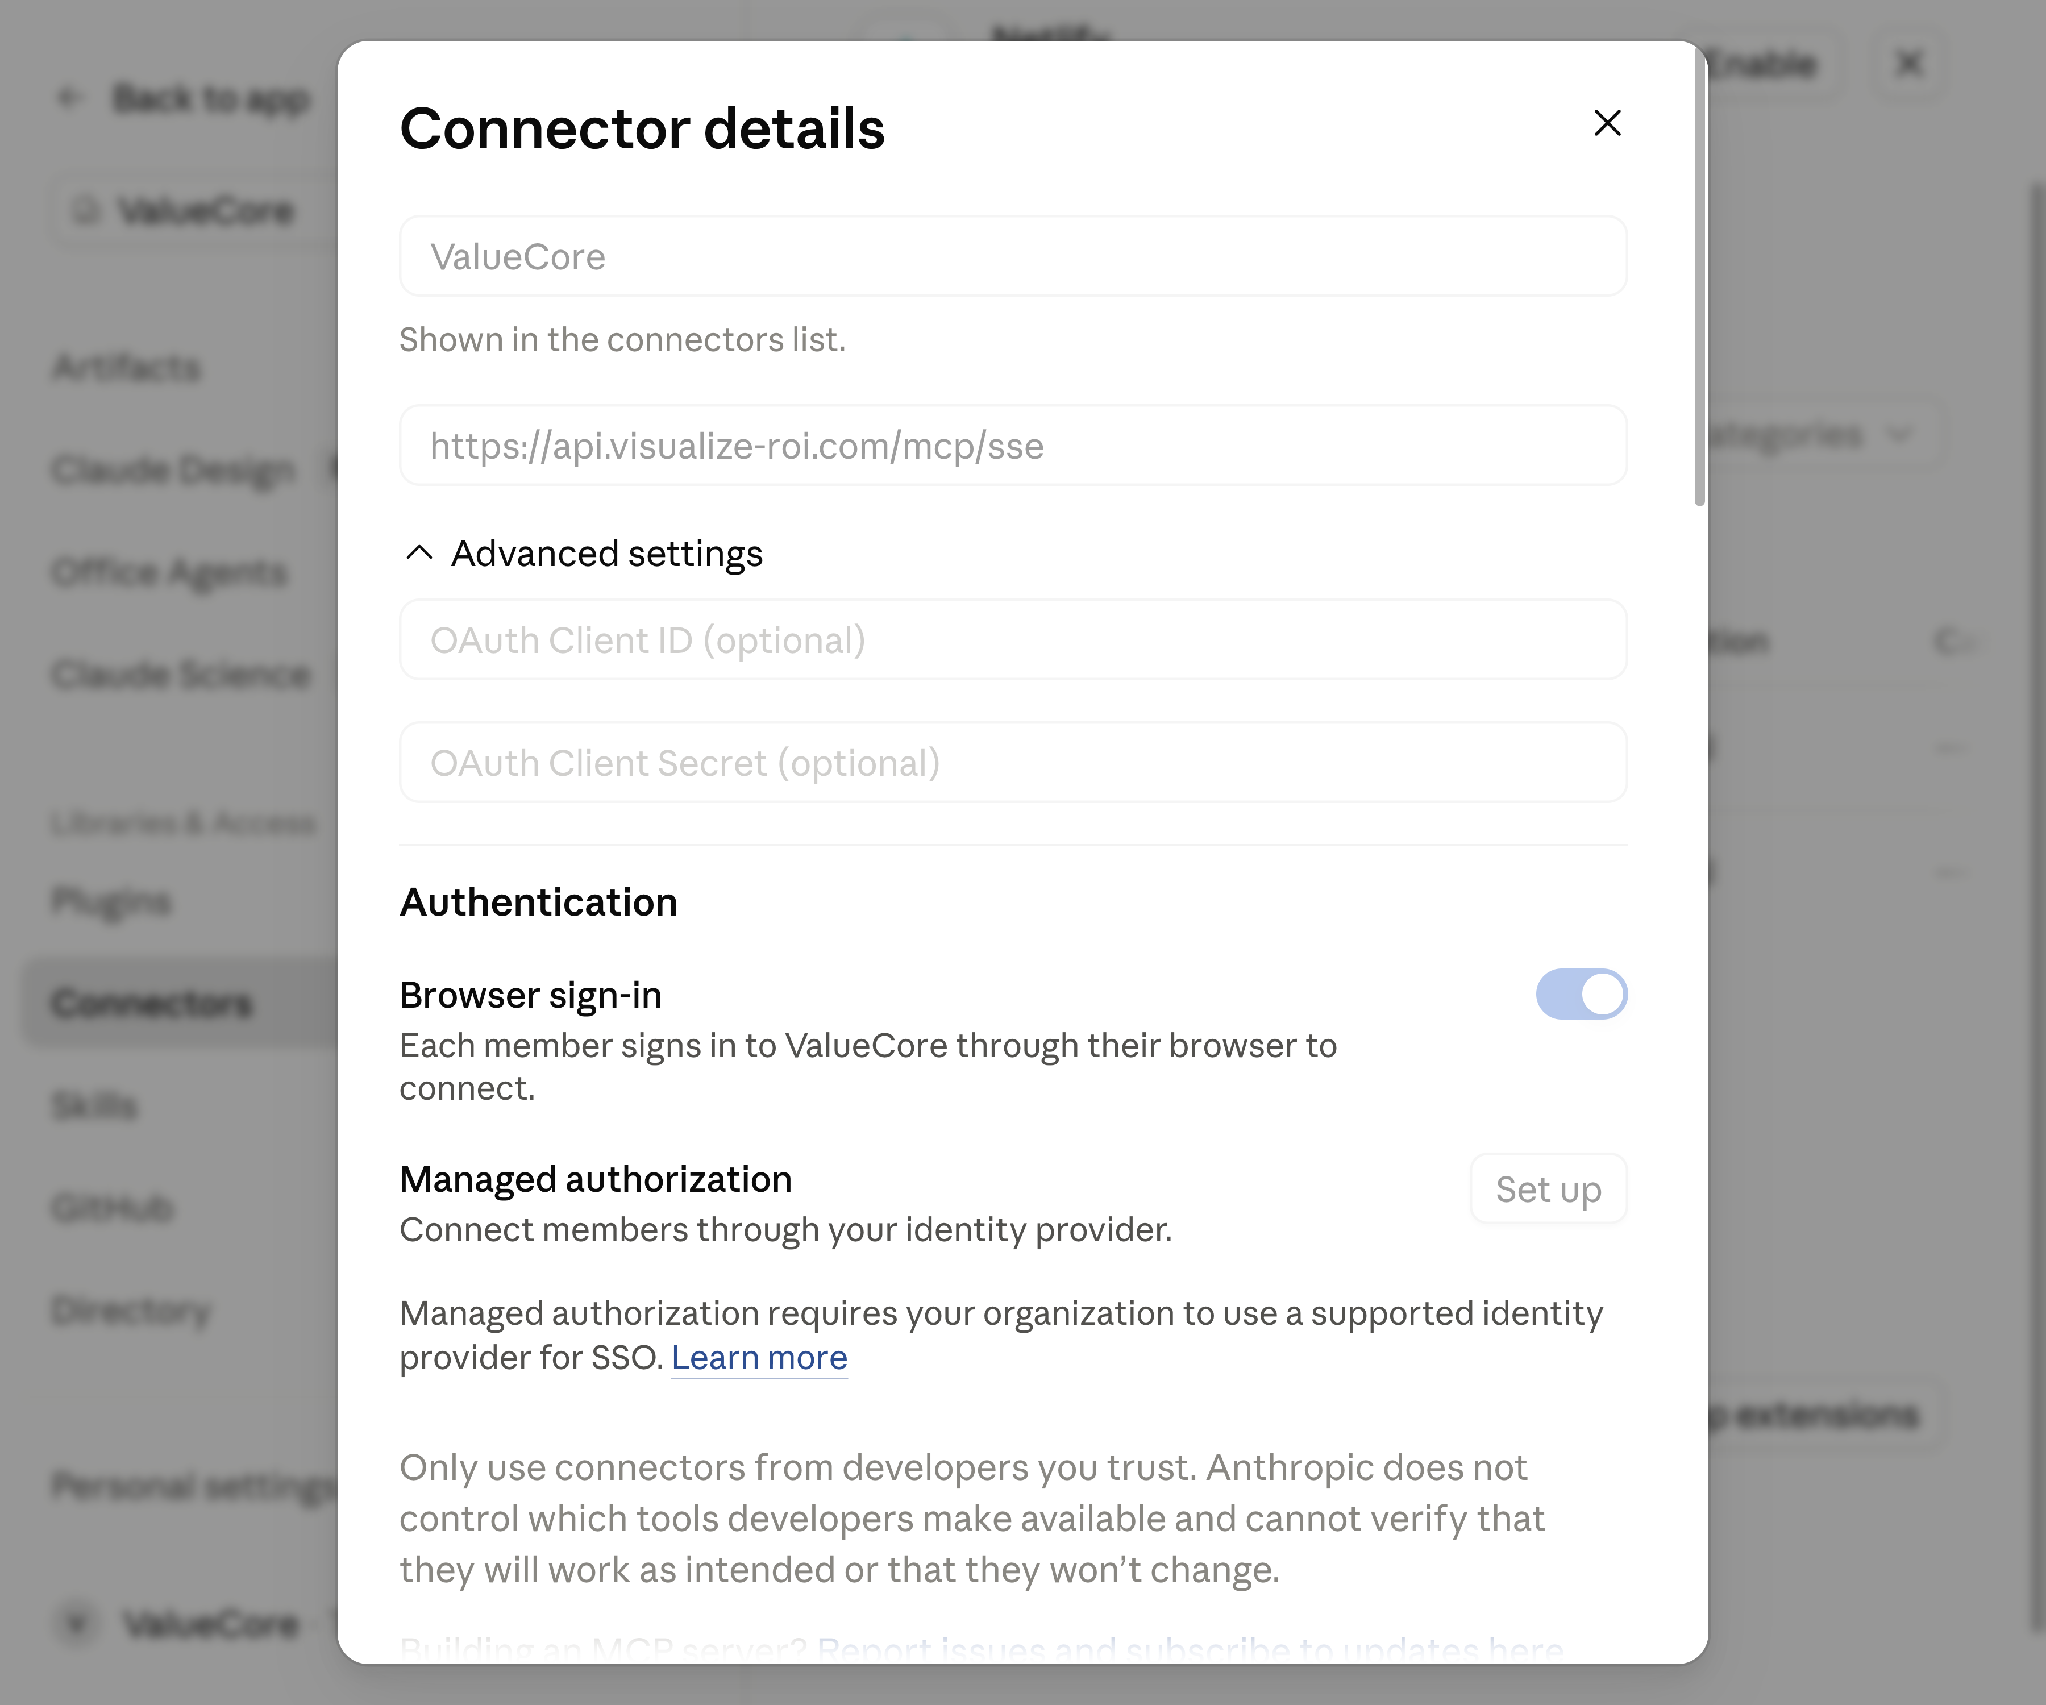
Figure 4. Organization connector details and individual browser sign-in.
Managed authorization requires a supported identity provider and connector configuration. A disabled Set up button does not prevent individual browser sign-in. Follow the Enterprise managed authentication guidance only when your organization meets those requirements.
7. Organization connection: expected result
Figure 5 shows the expected result after a member signs in. A newly added organization connector may still show Connect. First complete Member step 1 in the following section, including ValueCore authorization, then return to this status check.
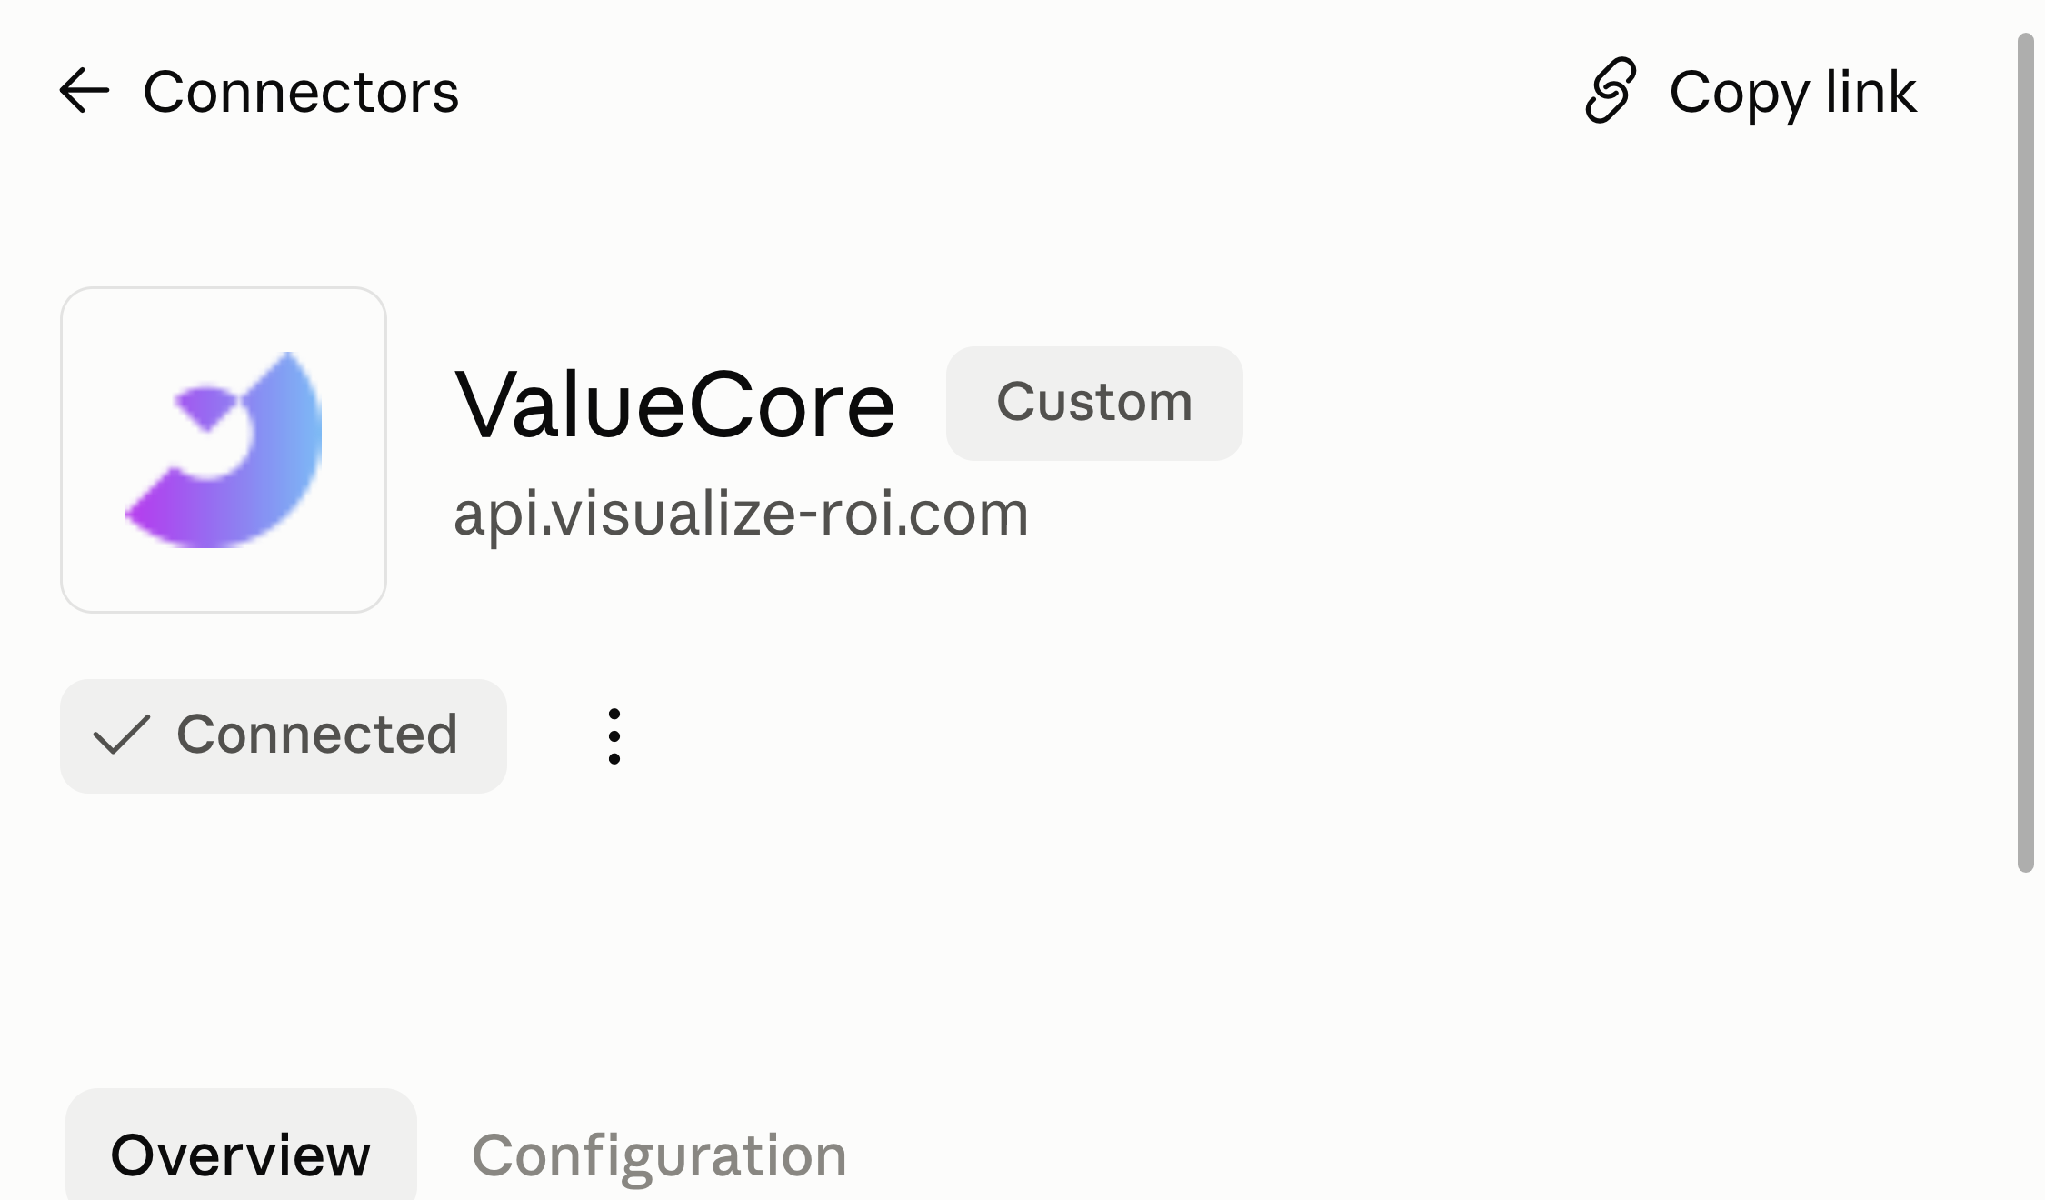
Figure 5. The approved production connector shows Connected in Claude Team.
After sign-in, open Customize > Connectors > ValueCore. Confirm the api.visualize-roi.com domain, Connected status, and the presence of whoami, get_instructions, and list_visualizer_types under Overview > Tools. Then run the three checks in Verify your ValueCore connection.
8. Member connection and organization verification
Member step 1: Connect the approved entry
Select the company organization in the account menu, then open Customize > Connectors. Find the approved ValueCore entry under Yours or Discover and select Connect if shown. Complete the browser authorization in Step 5 using your own ValueCore identity. An already authorized entry shows Connected, as in Figure 5.
Member step 2: Confirm both organizations
After sign-in, remain in the company’s Claude organization. Enable ValueCore in the conversation and run Check 1 in Verify your ValueCore connection. Check the returned ValueCore user and organization against your expected business account. Claude membership and ValueCore membership are separate access requirements.
Member step 3: Check business case access
Complete Checks 2 and 3 in Verify your ValueCore connection. Existing visualizers are scoped to the authenticated ValueCore user. Organization setup does not turn that connection into an administrator view of everyone’s records.
Administrator rollout check
Before a wider rollout, have two intended members connect separately and run whoami. Each should see their own ValueCore identity and the correct organization. If both see the same person, correct the account connections before continuing. Record the connector name, endpoint, approved audience, and support contact without recording credentials.
Enterprise managed authentication
Claude also offers centrally managed connector authentication through an identity provider when the connector supports it. That is a separate setup from organization approval. Use the individual ValueCore authorization flow in this guide unless ValueCore confirms support for your managed-auth configuration. A company SSO login to Claude alone does not establish a ValueCore connection.
If ValueCore is missing, ask the Owner to check the selected organization, saved connector, and role restrictions. Do not use a personal Claude account to bypass a company restriction. When someone leaves, review access in both Claude and ValueCore.
Learn more: Anthropic managed authentication requirements
9. Authorize your ValueCore account
Step 5: Sign in to ValueCore
When your assistant opens the ValueCore authorization page, confirm the address belongs to api.visualize-roi.com. Sign in with the ValueCore username and password you normally use. Your Google, Microsoft, or Claude sign-in does not replace your ValueCore sign-in.
Step 6: Use a personal access token for single sign-on
For single sign-on, sign in to your organization’s usual ValueCore website in another tab. In the account menu, open MCP Server Access (called AI Agent Access in some interfaces). Under Access Token, select Generate, then Copy. Return to the ValueCore authorization page, paste the token into Access token, and complete sign-in. Use your own personal token; do not use the Organization API Key.
For accounts using www.visualize-roi.com, the direct access page is https://www.visualize-roi.com/vr/user/mcpaccess. If your company uses a different ValueCore hostname, use its account-menu link instead. If the option is missing, ask your ValueCore administrator for the correct access page.
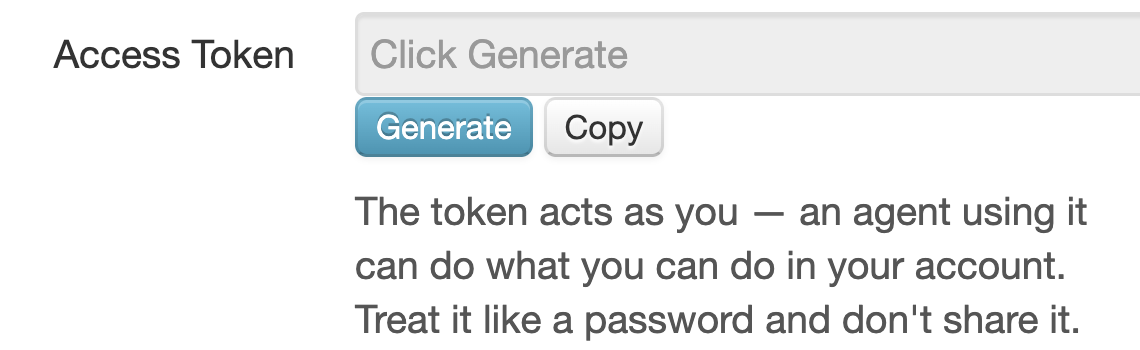
Figure 6. ValueCore MCP Server Access showing the personal Access Token controls before a token is generated.
Use the personal Access Token section for your own ValueCore user, including inside a company organization. Organization API Key is for a separate server integration and does not convert this connection into organization-wide access. Keep credentials out of chats and documents.
If the access page is unavailable, ask your ValueCore administrator to confirm your access and organization. Use your organization’s usual ValueCore website rather than guessing a different tenant URL.
Step 7: Return to Claude
After authorization, return to Claude Desktop in the same account and, for Team or Enterprise, the same organization. Open ValueCore and confirm Connected. Continue with the identity check before using business data.
10. Confirm the connection works
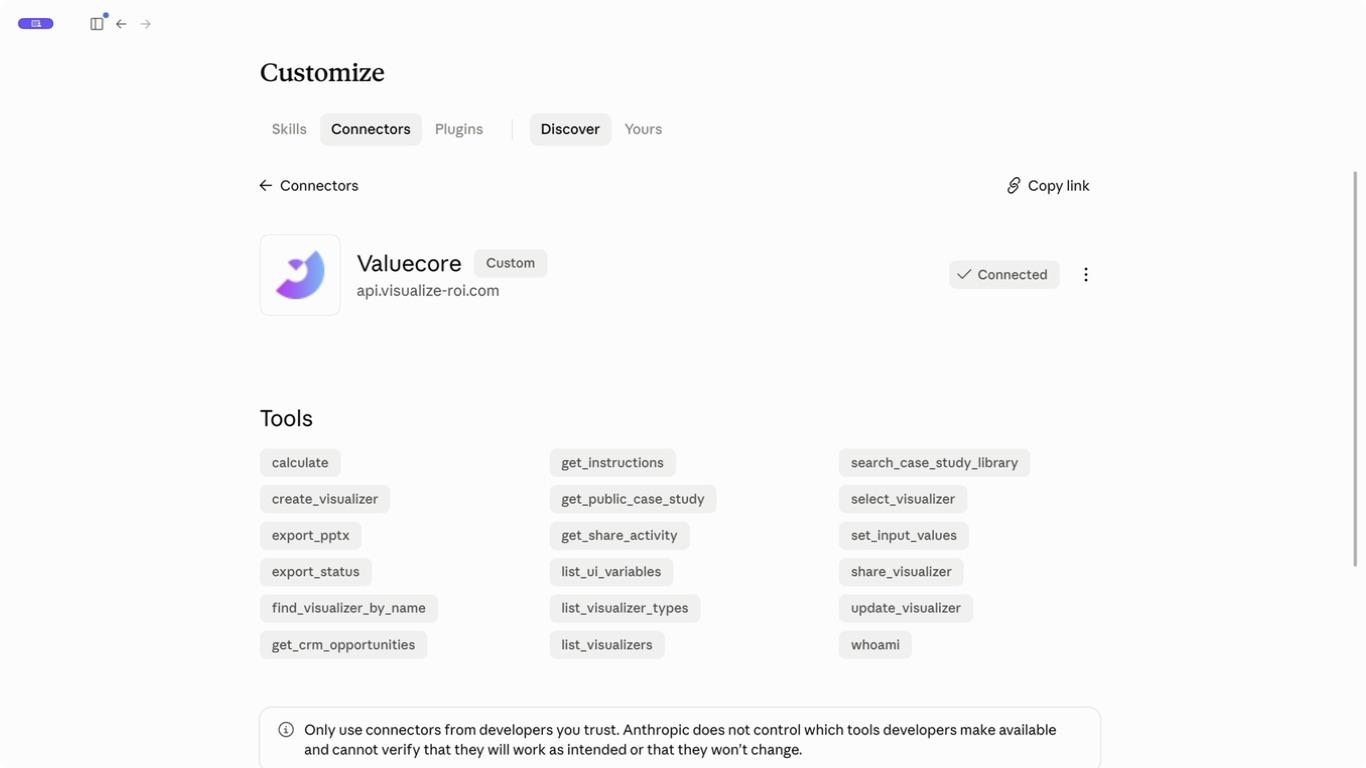
Figure 7. An existing ValueCore connector in Claude Desktop showing Connected and its discovered tools.
Step 8: Enable ValueCore in the conversation
Start a new chat. Open the plus menu (Add files, connectors and more), choose Connectors, and enable ValueCore for this conversation. Continue with the three checks in the following section. Review tool permission requests as you work.
11. Verify your ValueCore connection
Run these read-only checks after authorization and whenever you reconnect or change accounts. Start a new Chat conversation and enable ValueCore in the tools menu.
Check 1: Confirm who you are
Copy and send this prompt:
In Claude, expand the ValueCore tool-use entry in the response. Open the whoami result and compare the returned user and organization with your expected account. If the interface hides tool details, ask Claude to quote the whoami result from the actual call; do not accept a general description of ValueCore.
Prompt to send:
Use only the ValueCore whoami tool. Tell me my ValueCore user name and organization name. Do not create, update, share, or export anything.
Pass: The activity or tool details show whoami, and its result matches your expected ValueCore user and organization. Your assistant login and ValueCore identity may differ. If the wrong ValueCore account appears, reconnect before reading business data.
Check 2: List your visualizers
Prompt to send:
Use the ValueCore list_visualizers tool to list my recent visualizers. Show each name and its ValueCore link. Do not create or change anything.
Pass: The tool returns your own business cases, or completes successfully with an empty list. An empty list is valid when you own no matching visualizers. An authorization error, timeout, or answer without a tool call is not a successful check. If at least one result is returned, open one link and confirm it is the expected case. If the list is empty, continue to Check 3.
Check 3: Confirm available models
Prompt to send:
Use ValueCore get_instructions and list_visualizer_types. Summarize my organization’s instructions and list the business case models available to me. Do not create anything.
Pass: Both tools respond without an authentication error. Confirm that the models are appropriate for your organization. If no models are available, contact your ValueCore administrator.
Before company rollout
Have two intended members authorize separately and complete Checks 1 and 2. Each must receive their own expected ValueCore identity. A shared app definition does not provide access to everyone’s records. Save the test date and outcome without saving credentials.
12. Use ValueCore in your daily work
Start with a read request. When you are ready to make changes, identify the exact business case and review the proposed inputs. Replace the example names below with your own names; the prompts are examples, and results will reflect your own data.
Step 9: Find an existing business case
Ask for your own recent records or search by a business case name. The examples below use list_visualizers and find_visualizer_by_name.
Prompt to send:
Use the ValueCore list_visualizers tool to list my recent business cases with their names and links. Do not change anything.
Find my ValueCore business case with Acme in the name. If several match, show the choices before selecting one.
Step 10: Inspect and explain results
Select the matching business case before asking for its inputs, assumptions, or output values. Ask for a specific section when a model is large.
Prompt to send:
For the business case I selected, show the current inputs and calculated outputs in its ROI section. Explain the assumptions and include the link to open it in ValueCore. Do not modify values.
Step 11: Create or update a business case
Choose either creation or an update to an existing case. Review the case identity and proposed values before confirming a change. Replace bracketed examples with your actual field names and values.
Prompt to send:
Help me create a business case named Acme Evaluation. First list the suitable ValueCore models and ask me to select one. Then show the proposed inputs and ask me to confirm before creating or updating anything.
To update an existing case, use this separate request:
Prompt to send:
Find my business case named Acme Evaluation. If several match, ask me to select one. Show its current inputs, then propose changing [input name] to [new value]. Ask me to confirm the case and changes before updating it. After confirmation, report accepted and rejected inputs and read the calculated results. Do not create, share, or export a case.
For percentage inputs, 20 means 20%, not 0.2. Use plain numeric currency amounts without symbols. Ask the assistant to report accepted and rejected inputs and then read the calculated outputs. A partially rejected update is not a complete success.
Step 12: Prepare a share link or PowerPoint
Review the calculated results first. Sharing creates a customer-facing snapshot and a new link; later input changes do not update that snapshot. Exporting starts a PowerPoint generation job.
Prompt to send:
Export the reviewed business case to PowerPoint once. Check the existing export job until it completes and return its download link. Do not create a share link.
Keep the job identifier if an export is still processing. Ask for its status rather than starting duplicate exports. Give a customer-facing share link only when you intend others to open that snapshot.
To create a share link instead of a PowerPoint, use this separate request:
Prompt to send:
Show the name and link of the business case we reviewed and ask me to confirm creating a customer-facing share snapshot. After I confirm, call share_visualizer once and return the share link. Do not send the link to anyone or export PowerPoint. Explain that later edits to the original case do not update this snapshot.
13. Troubleshooting and access management
| What you see | What to do |
|---|---|
| Add is missing | Confirm the selected Claude account and organization. An Owner adds organization connectors. On Claude Free, check whether the single custom-connector slot is already occupied. |
| URL already exists | Use the existing ValueCore connector. Do not create a duplicate or remove a working connection just to repeat setup. |
| SSE deprecation notice | Keep the full ValueCore URL. Choose Streamable HTTP in Advanced if offered; the URL supports that transport. |
| Connected but no tool call | Enable ValueCore in this conversation and request whoami by name. Check the tool permission prompt. |
| Sign in fails or loops | Confirm your ValueCore sign-in. For single sign-on, use the personal Access Token path described earlier. |
| No cases or not found | Check whoami first. Existing visualizers are owner-scoped; try a shorter search term or list your recent cases. |
14. Disconnect or change accounts
Open Customize → Connectors → ValueCore and use its actions menu to disconnect or remove it. To use another ValueCore account, reconnect and repeat whoami. In a managed organization, an Owner may need to manage the connector definition.
Disconnecting the assistant does not delete business cases or undo prior changes, shares, or exports. Treat a personal token as a password. If it may have been exposed, contact ValueCore support; removing a connector is not a promise that the underlying token has been invalidated.
15. Get help
Contact support@valuecore.ai with the name of the AI assistant you are using, your organization, the step that failed, the exact error, and the time it occurred. Include a screenshot with credentials and customer data hidden. Never send passwords, access tokens, or authorization codes.
Learn more: Claude guidance on remote custom connectors
Screenshots show Claude Desktop personal setup and Claude Team organization settings in the browser. Enterprise role and managed-authorization guidance is described separately. Menu labels can vary by version. Guidance reviewed September 9, 2026.