
Connect ValueCore to ChatGPT: MCP Connection Guide
1. Overview
Audience Business and Enterprise workspaces
Set up ValueCore in the company’s ChatGPT workspace so approved members can connect their own ValueCore accounts. This guide covers workspace preparation, app publication, member authorization, and identity checks. Use ChatGPT on the web for the custom MCP administration workflow.
2. Choose the correct workspace
Sign in with your work account and select the company workspace from the account menu. A personal ChatGPT subscription does not grant a role in the company workspace. Confirm the intended workspace before creating the ValueCore app.
Business administrator access
An Admin or Owner must enable developer mode for their own account and create and publish the custom app. Business does not let an administrator grant developer mode to an ordinary member. Check Workspace settings > Members to identify an Admin or Owner.
Enterprise administrator access
Admins and Owners can authorize selected developers through role-based access control. Developer permission allows private testing; publication remains an Admin or Owner action. Set the intended audience and permitted actions before releasing ValueCore.
Step 1: Enable app creation
Confirm the company workspace in the account menu. Open Settings > Security and login and enable Developer mode for the account performing setup. Return to Workspace settings > Apps to create the company app. Enterprise administrators may first need to grant the relevant developer permission.
If the switch is locked, ask the workspace Admin or Owner to perform this step. On Business, asking for member developer access will not resolve it; an Admin or Owner must create the app. Members use the approved app after publication.
Step 2: Prepare the ValueCore account
Identify the expected ValueCore user and organization for the pilot. Have the organization’s normal ValueCore sign-in ready. The app definition is shared; ValueCore data access remains tied to the user who authorizes it. Do not place a shared personal token in the app’s name, description, or URL.
Learn more: OpenAI workspace roles and custom MCP deployment
3. Create the ValueCore app
Step 3: Enter the server details
In Workspace settings > Apps, choose Create. Enter ValueCore as the name and a short description of the business-case workflow. Select Server URL and enter the complete address below. Figure 1 shows the administrator form.
https://api.visualize-roi.com/mcp/sse
Select OAuth authentication. ValueCore provides dynamic registration and discovery. Leave optional client credentials empty unless ValueCore supplies integration-specific values. An Organization API Key is not an OAuth client secret. If discovery fails, send the exact error to ValueCore support.
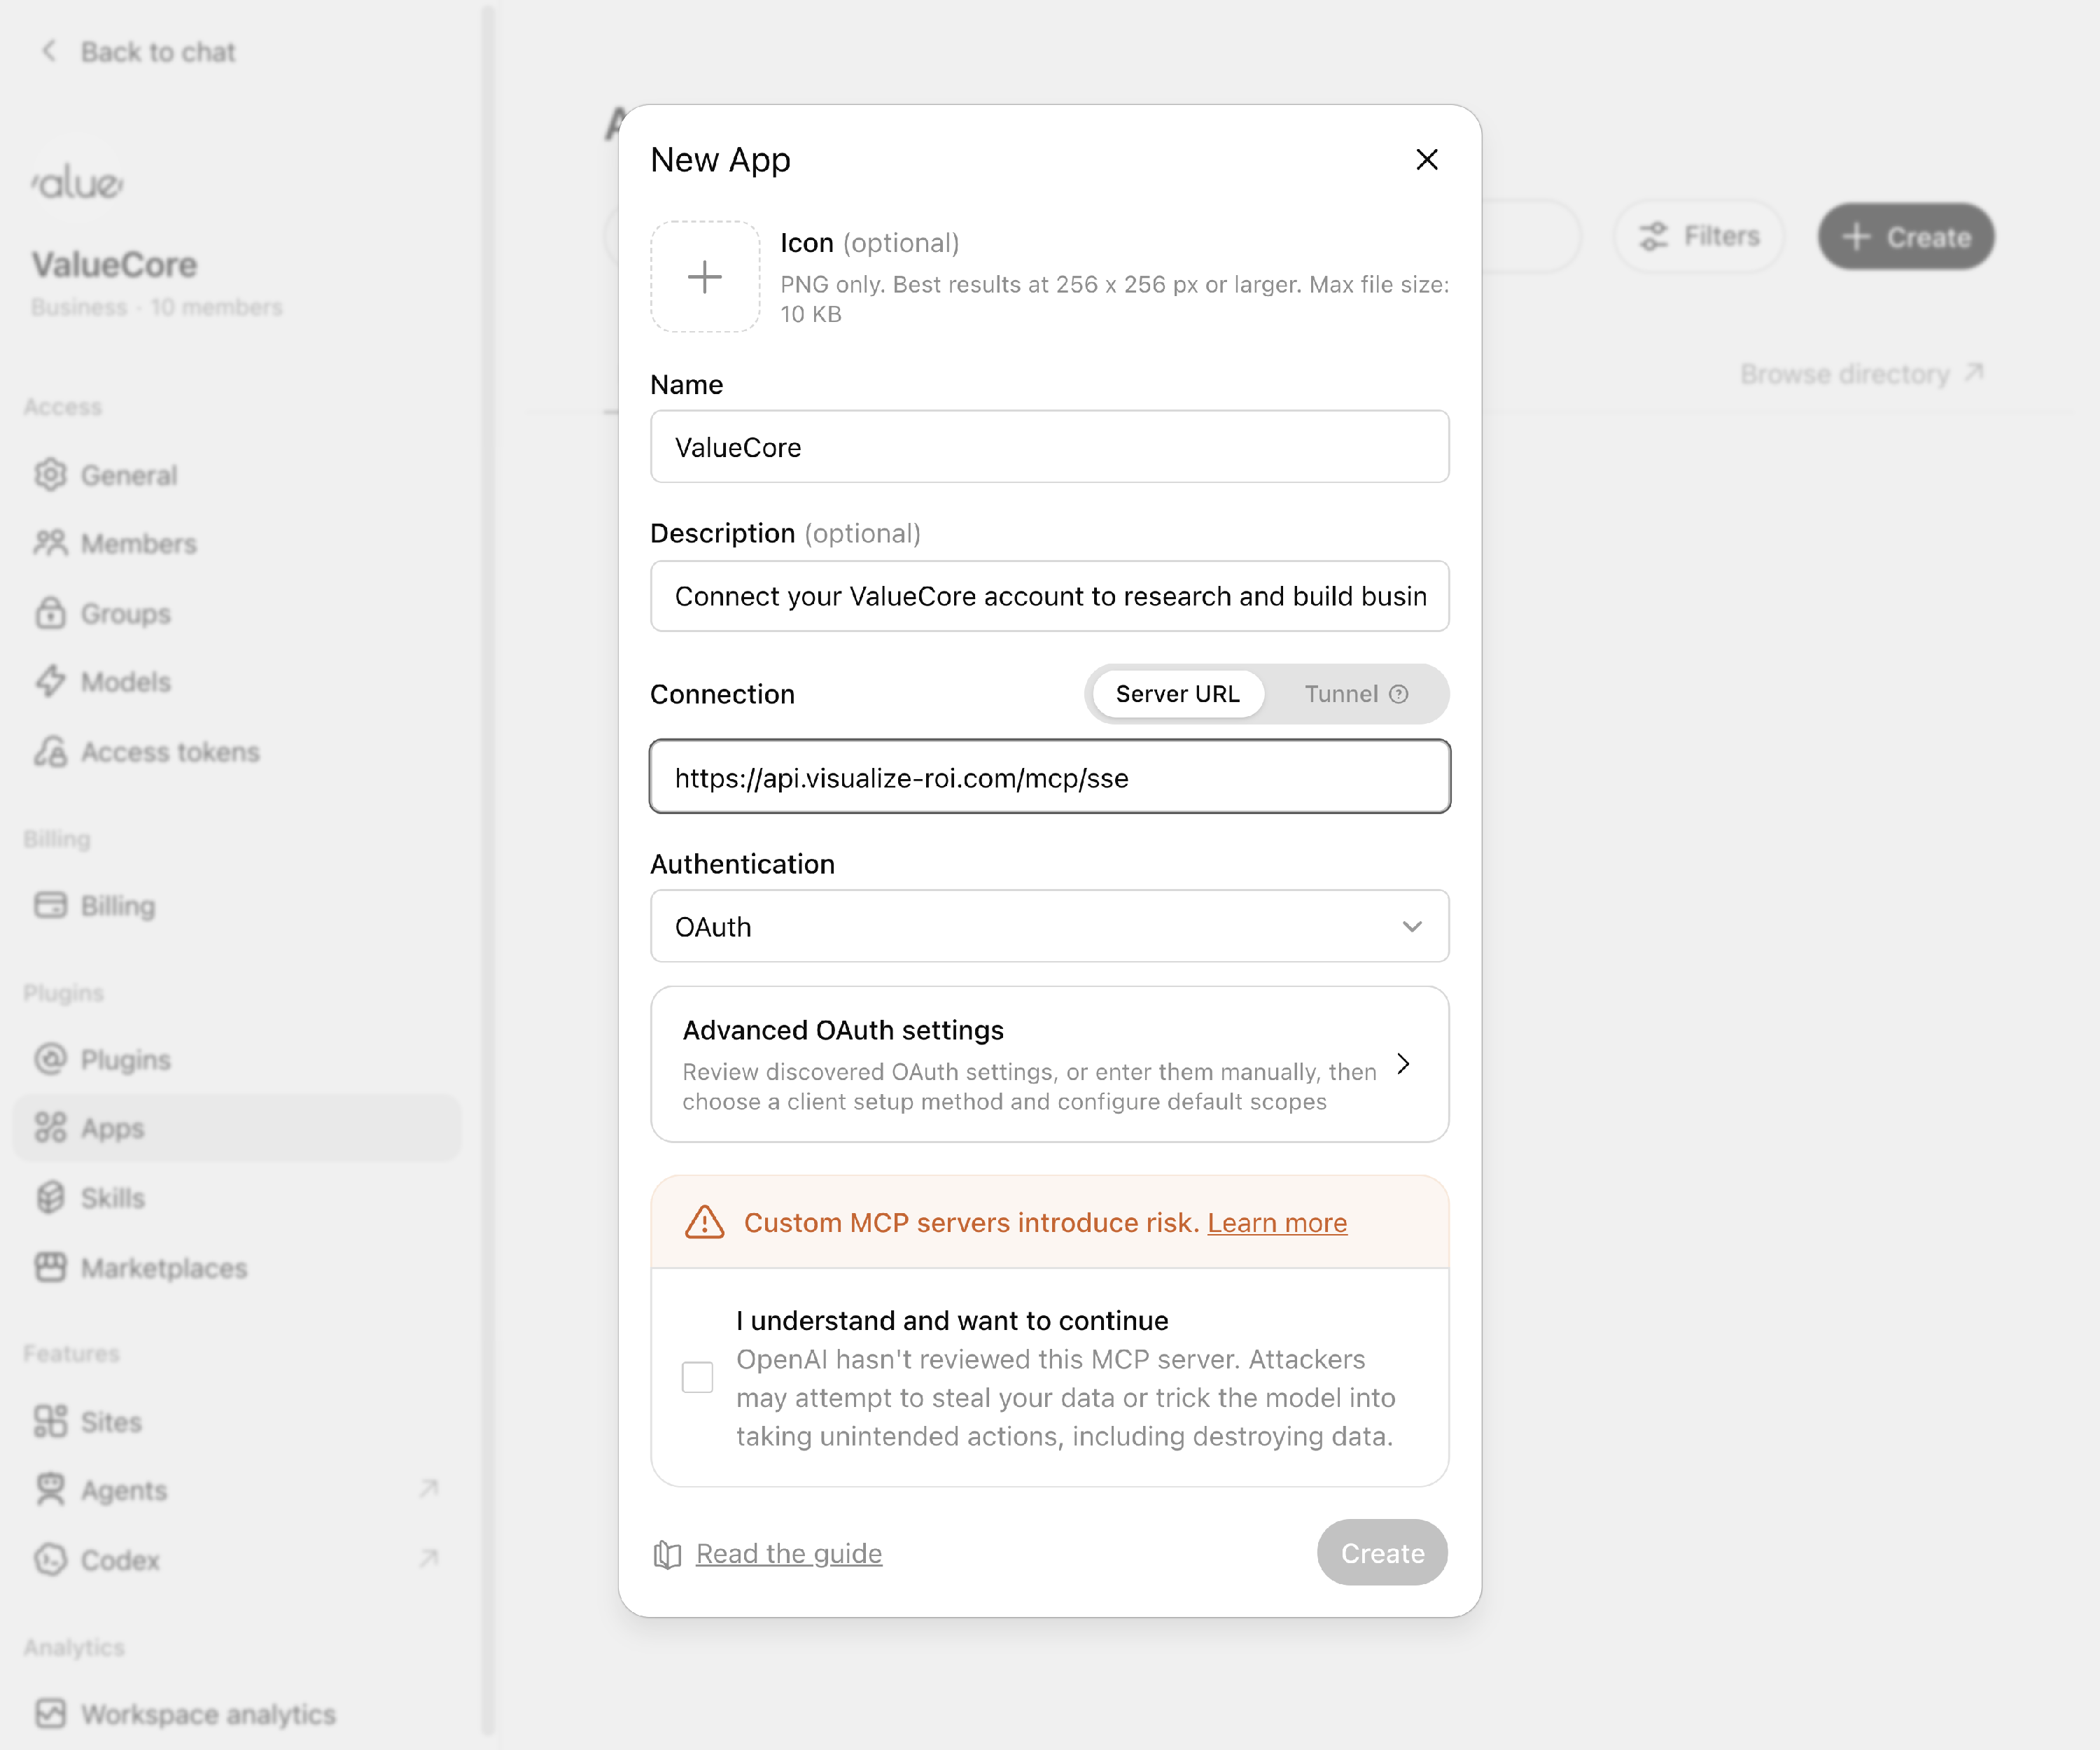
Figure 1. ValueCore configuration in the company administrator console.
4. Authorize your ValueCore identity
Step 4: Authorize your ValueCore identity
Review the server notice and select I understand and want to continue. Create becomes available after the required fields and acknowledgment are complete. Select Create. If Scan Tools is shown, select it and follow the authorization prompt.
Follow the route shown in your interface. In Apps, open ValueCore and select Connect or Sign in with ValueCore. In Plugins, open ValueCore, open Plugin actions, choose Manage, and select Connect in the Connection section. Then select Sign in with ValueCore. Confirm that the authorization page is on api.visualize-roi.com. These are alternative routes to the same sign-in, not consecutive steps.
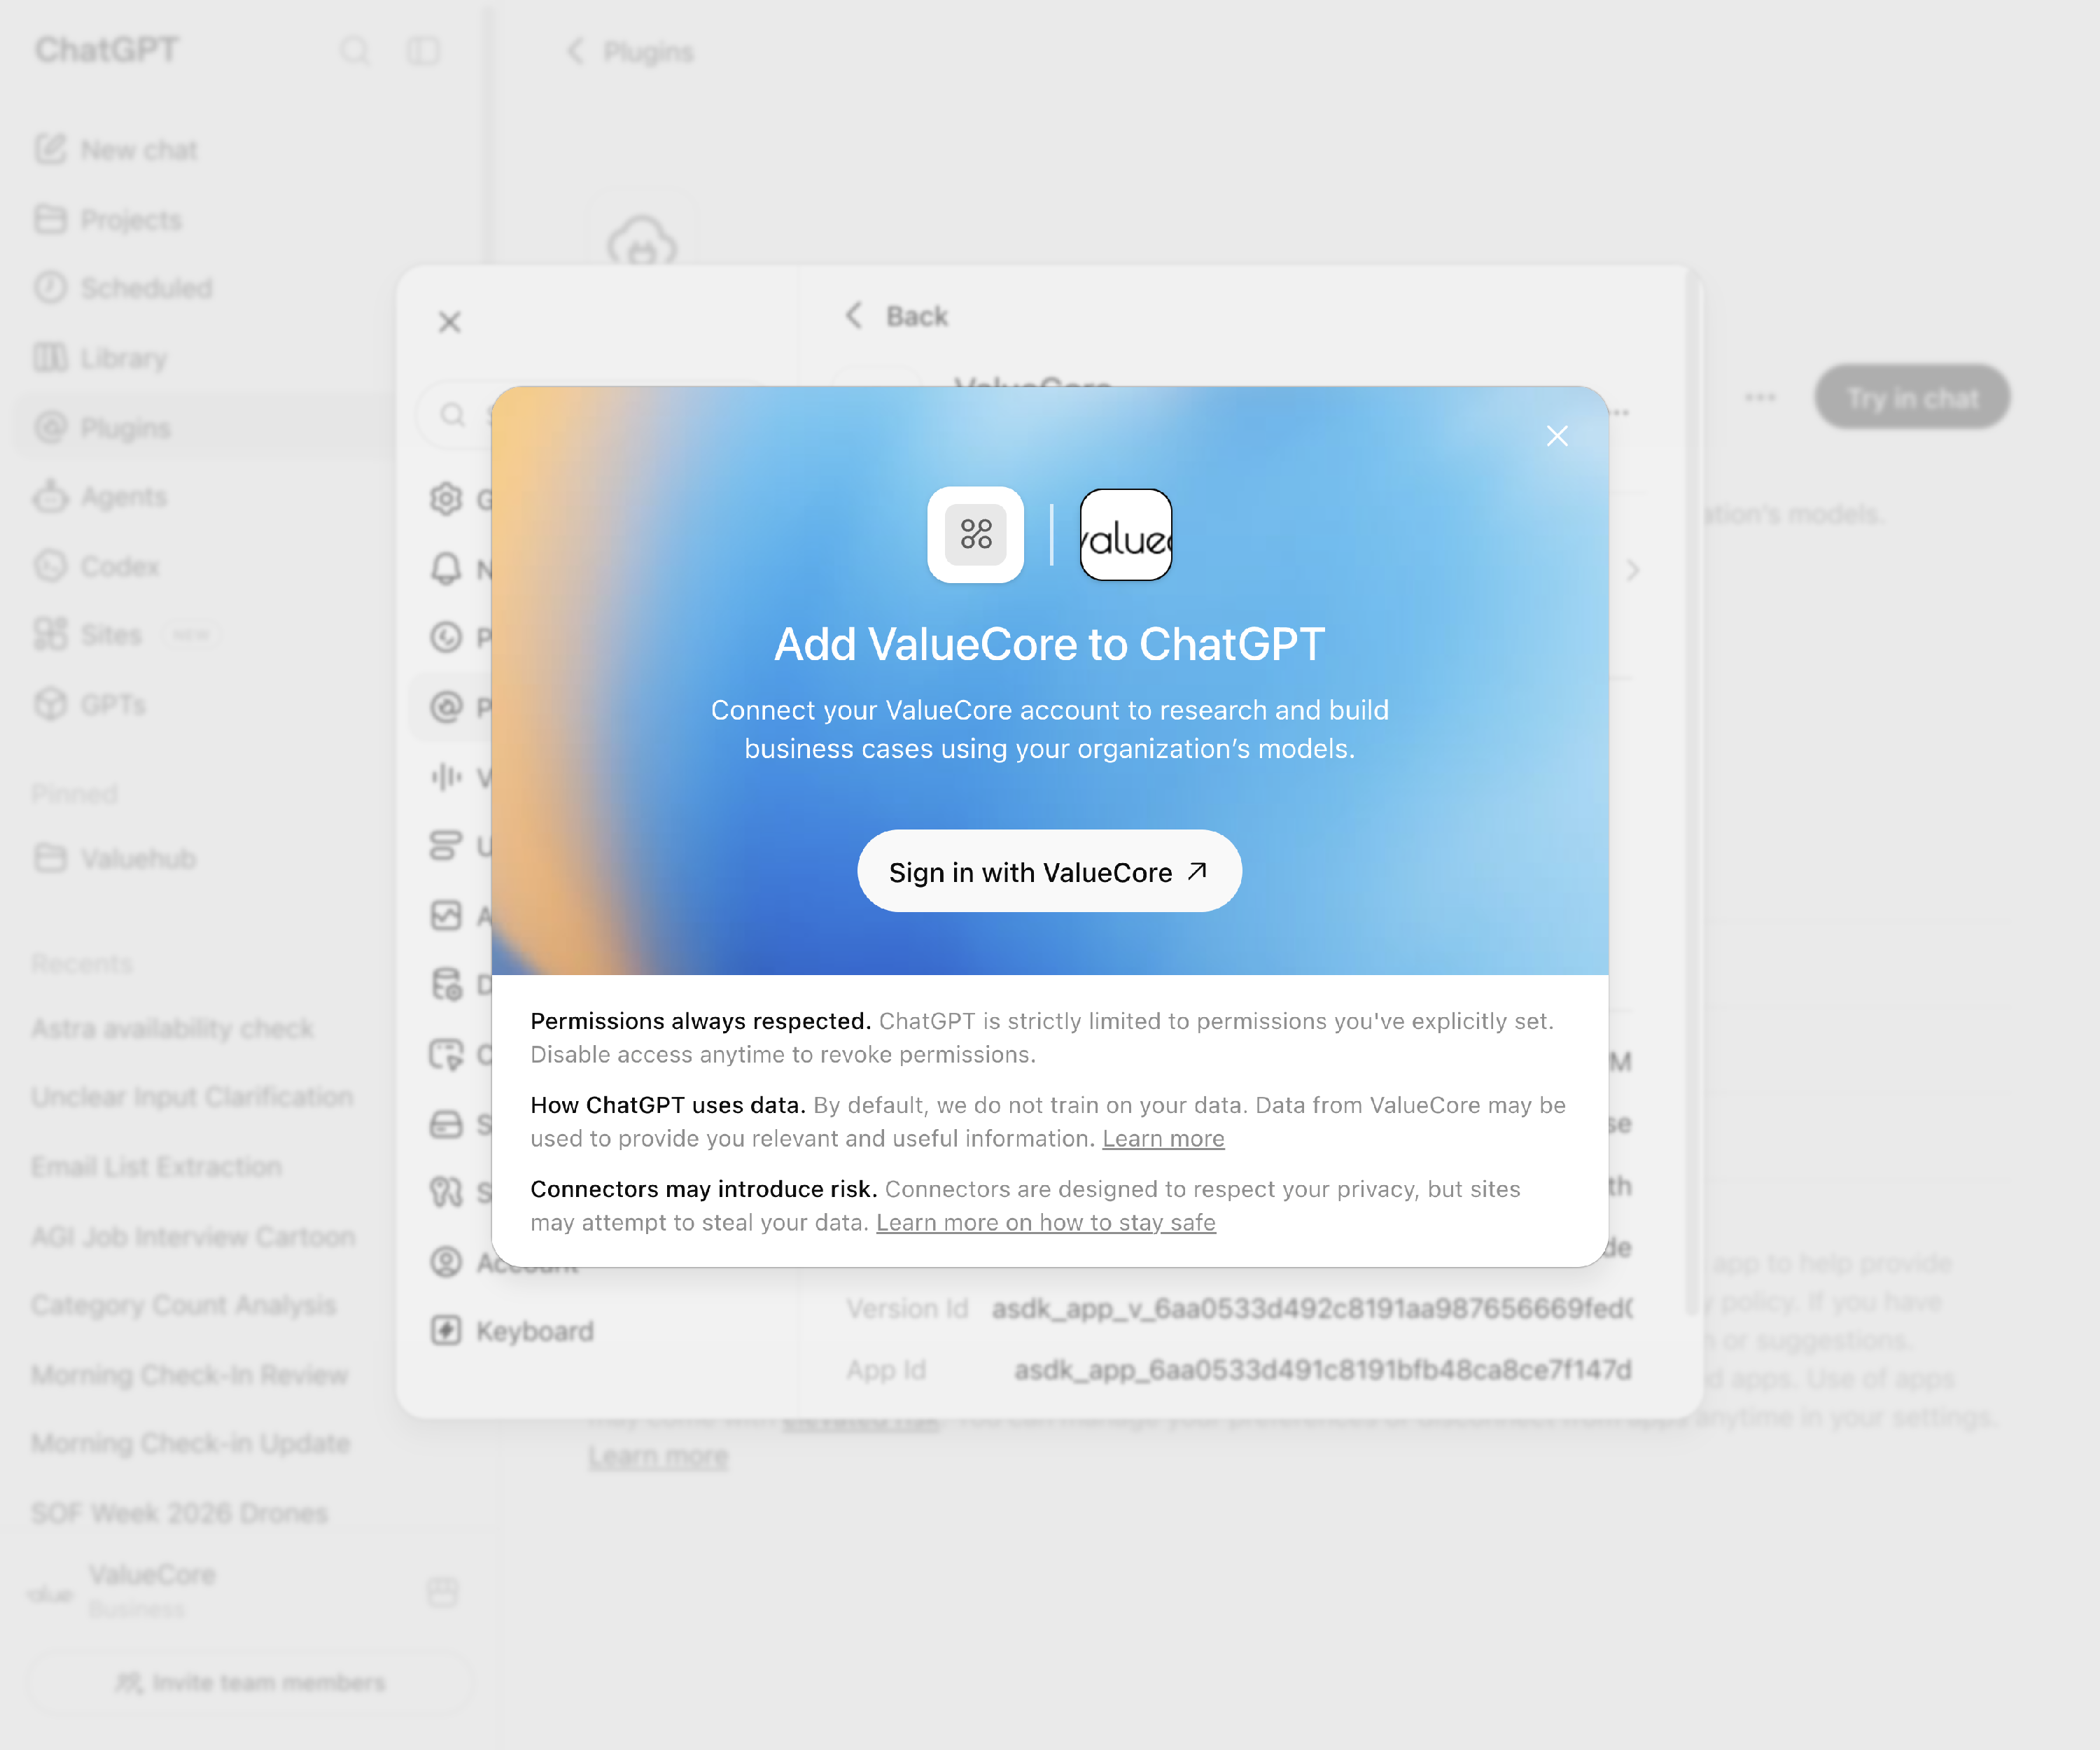
Figure 2. ChatGPT opens ValueCore authorization for the individual user.
5. Authorize the correct company account
Verify the current ValueCore user and organization before signing in. Enter your own ValueCore username and password, or use the Access token field for single sign-on. Select Sign in & Allow and return to ChatGPT to review the available actions.
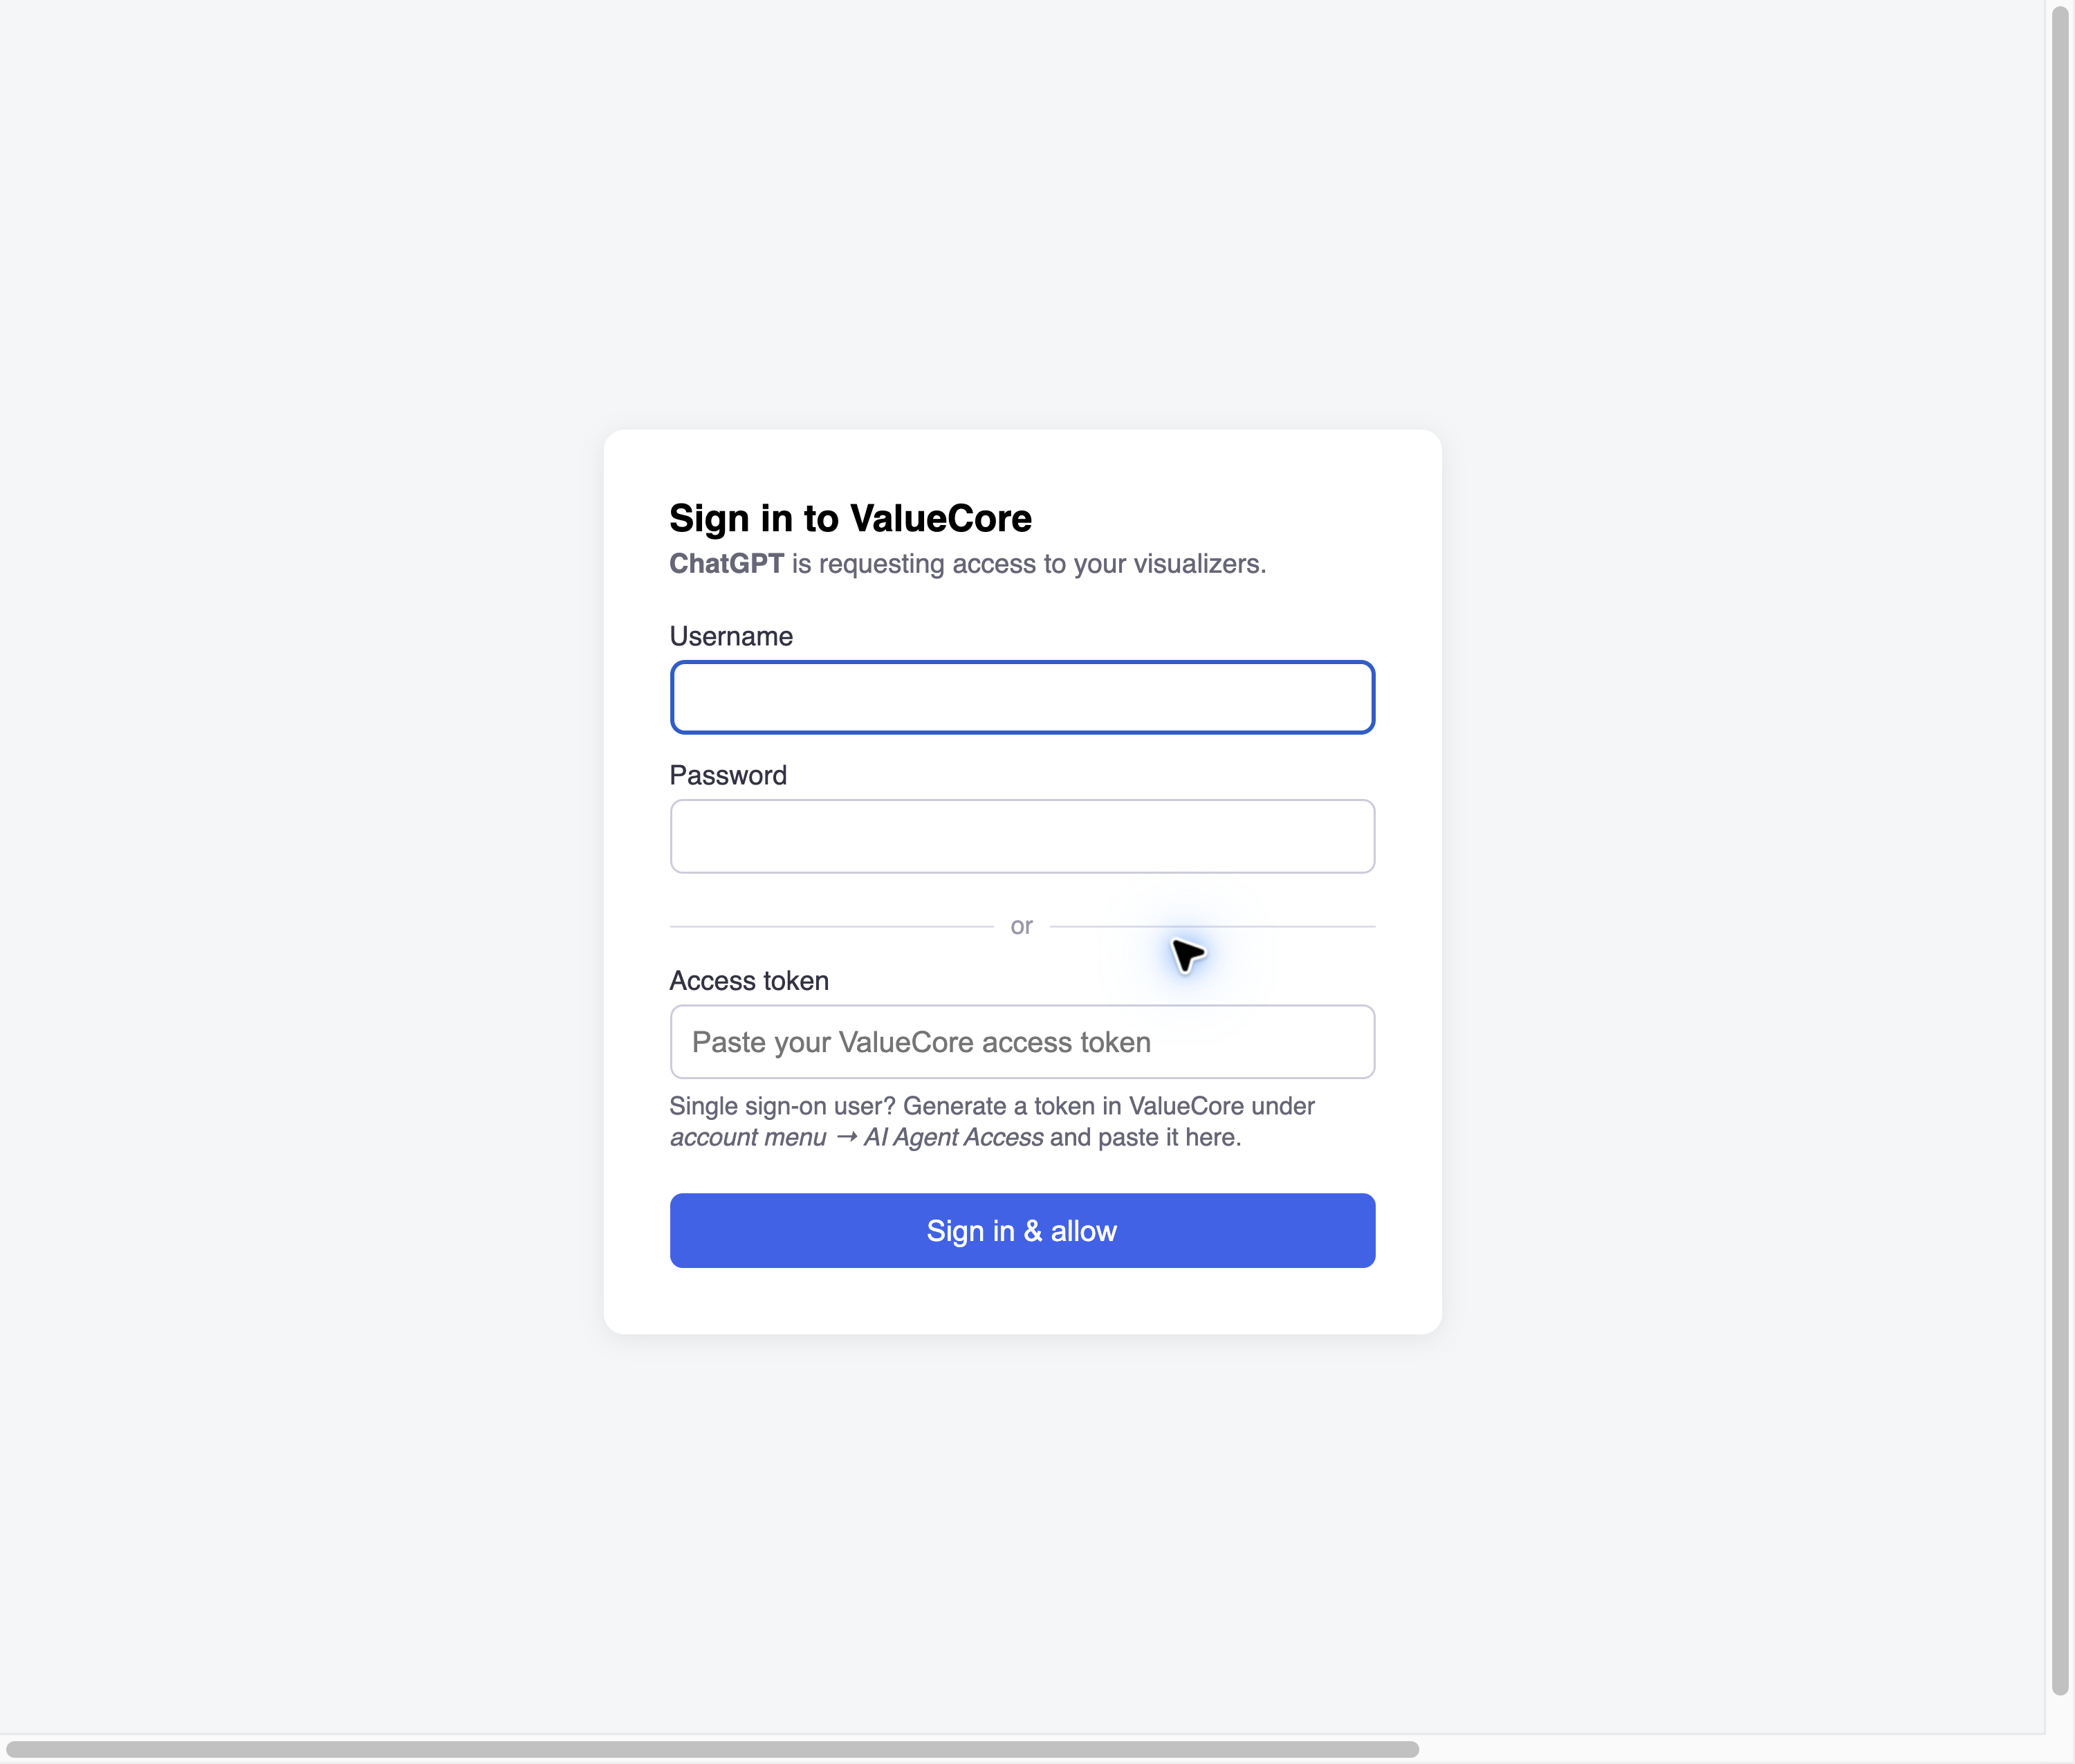
Figure 3. ValueCore authorization with empty credential fields. Never share a token in a chat or guide.
For single sign-on, sign in to your organization’s usual ValueCore website in another tab. In the account menu, open MCP Server Access (called AI Agent Access in some interfaces). Under Access Token, select Generate, then Copy. Return to the ValueCore authorization page, paste the token into Access token, and complete authorization there. Never paste it into ChatGPT chat. Use your own personal token; do not use Organization API Key.
For accounts using www.visualize-roi.com, the direct access page is https://www.visualize-roi.com/vr/user/mcpaccess. If your company uses a different ValueCore hostname, use its account-menu link instead. If the option is missing, ask your ValueCore administrator for the correct access page.
6. Review tools and test the draft
After authorization, review the app actions and confirm that whoami, get_instructions, and list_visualizer_types are available. Use Scan Tools or Refresh if offered. An app tile alone does not confirm a working connection. Do not publish while the app shows No app actions available yet.
Step 5: Verify the draft connection
For administrator draft testing, start a new chat in the company workspace. Open the composer’s plus menu, choose Developer mode, and select the draft ValueCore app. Send the prompt below. Ordinary members use the published app; they do not need to create a draft.
Prompt to send:
Use the ValueCore whoami tool and tell me which ValueCore user and organization this connection is using. Do not create, update, share, or export anything.
The reply must include a real tool invocation and your expected ValueCore identity. Complete all three checks in Verify your ValueCore connection before publishing.
If identity is wrong, reconnect before continuing. An empty business-case list may reflect user ownership rather than a broken connection. Test approved write actions only against a designated test case before enabling them for the audience.
Learn more: OpenAI connection and tool-testing guidance
7. Publish and connect organization members
Step 6: Publish the approved app
An Admin or Owner opens Workspace settings > Apps > Drafts and publishes the reviewed ValueCore app. On Enterprise, apply the intended role access and action controls. Keep the approved audience aligned with the pilot and rollout plan.
Locate the app in Drafts
Return to Workspace settings > Apps > Drafts. Wait for the app list to load. Locate ValueCore and select Publish. Confirm the workspace name in the next dialog before making the app available to its members.
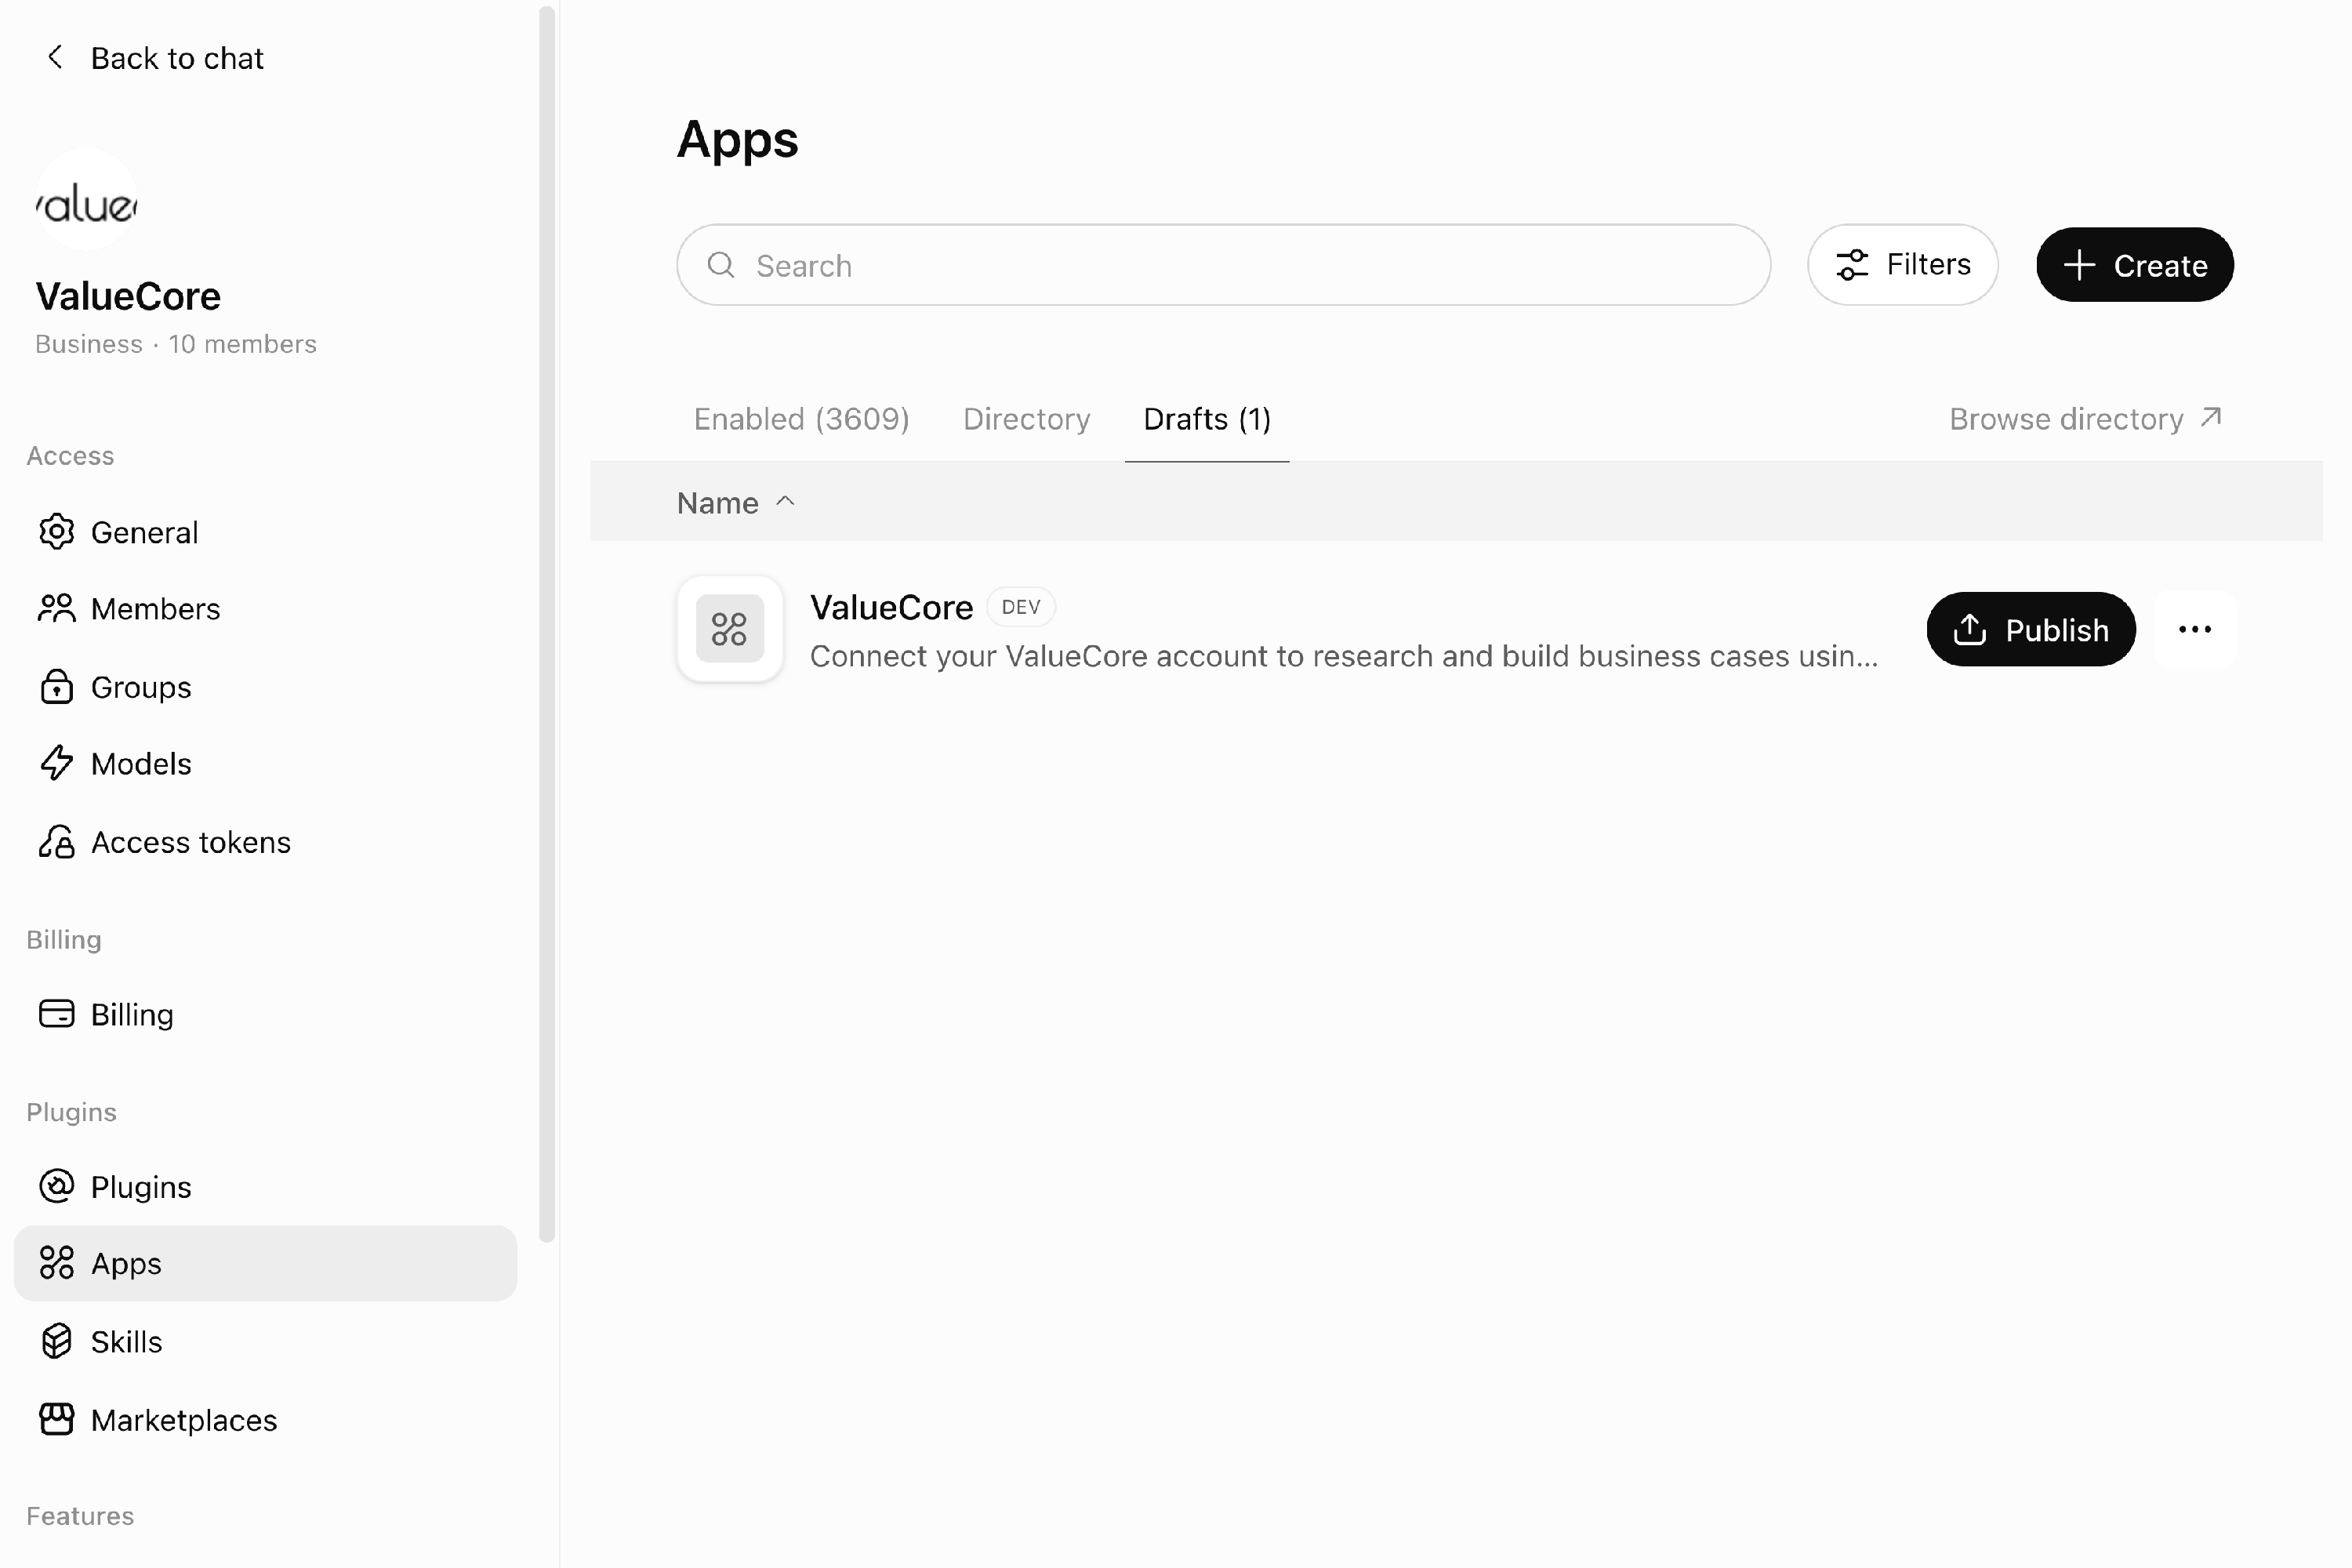
Figure 4. The tested development app appears in the company workspace Drafts list.
8. Complete publication review
Expand each review section. Read the data-access and server-trust information, review the tool inputs, and acknowledge only the statements your organization has verified. Select Publish when the review is complete. Then confirm that ValueCore appears under Enabled and no longer remains in Drafts.
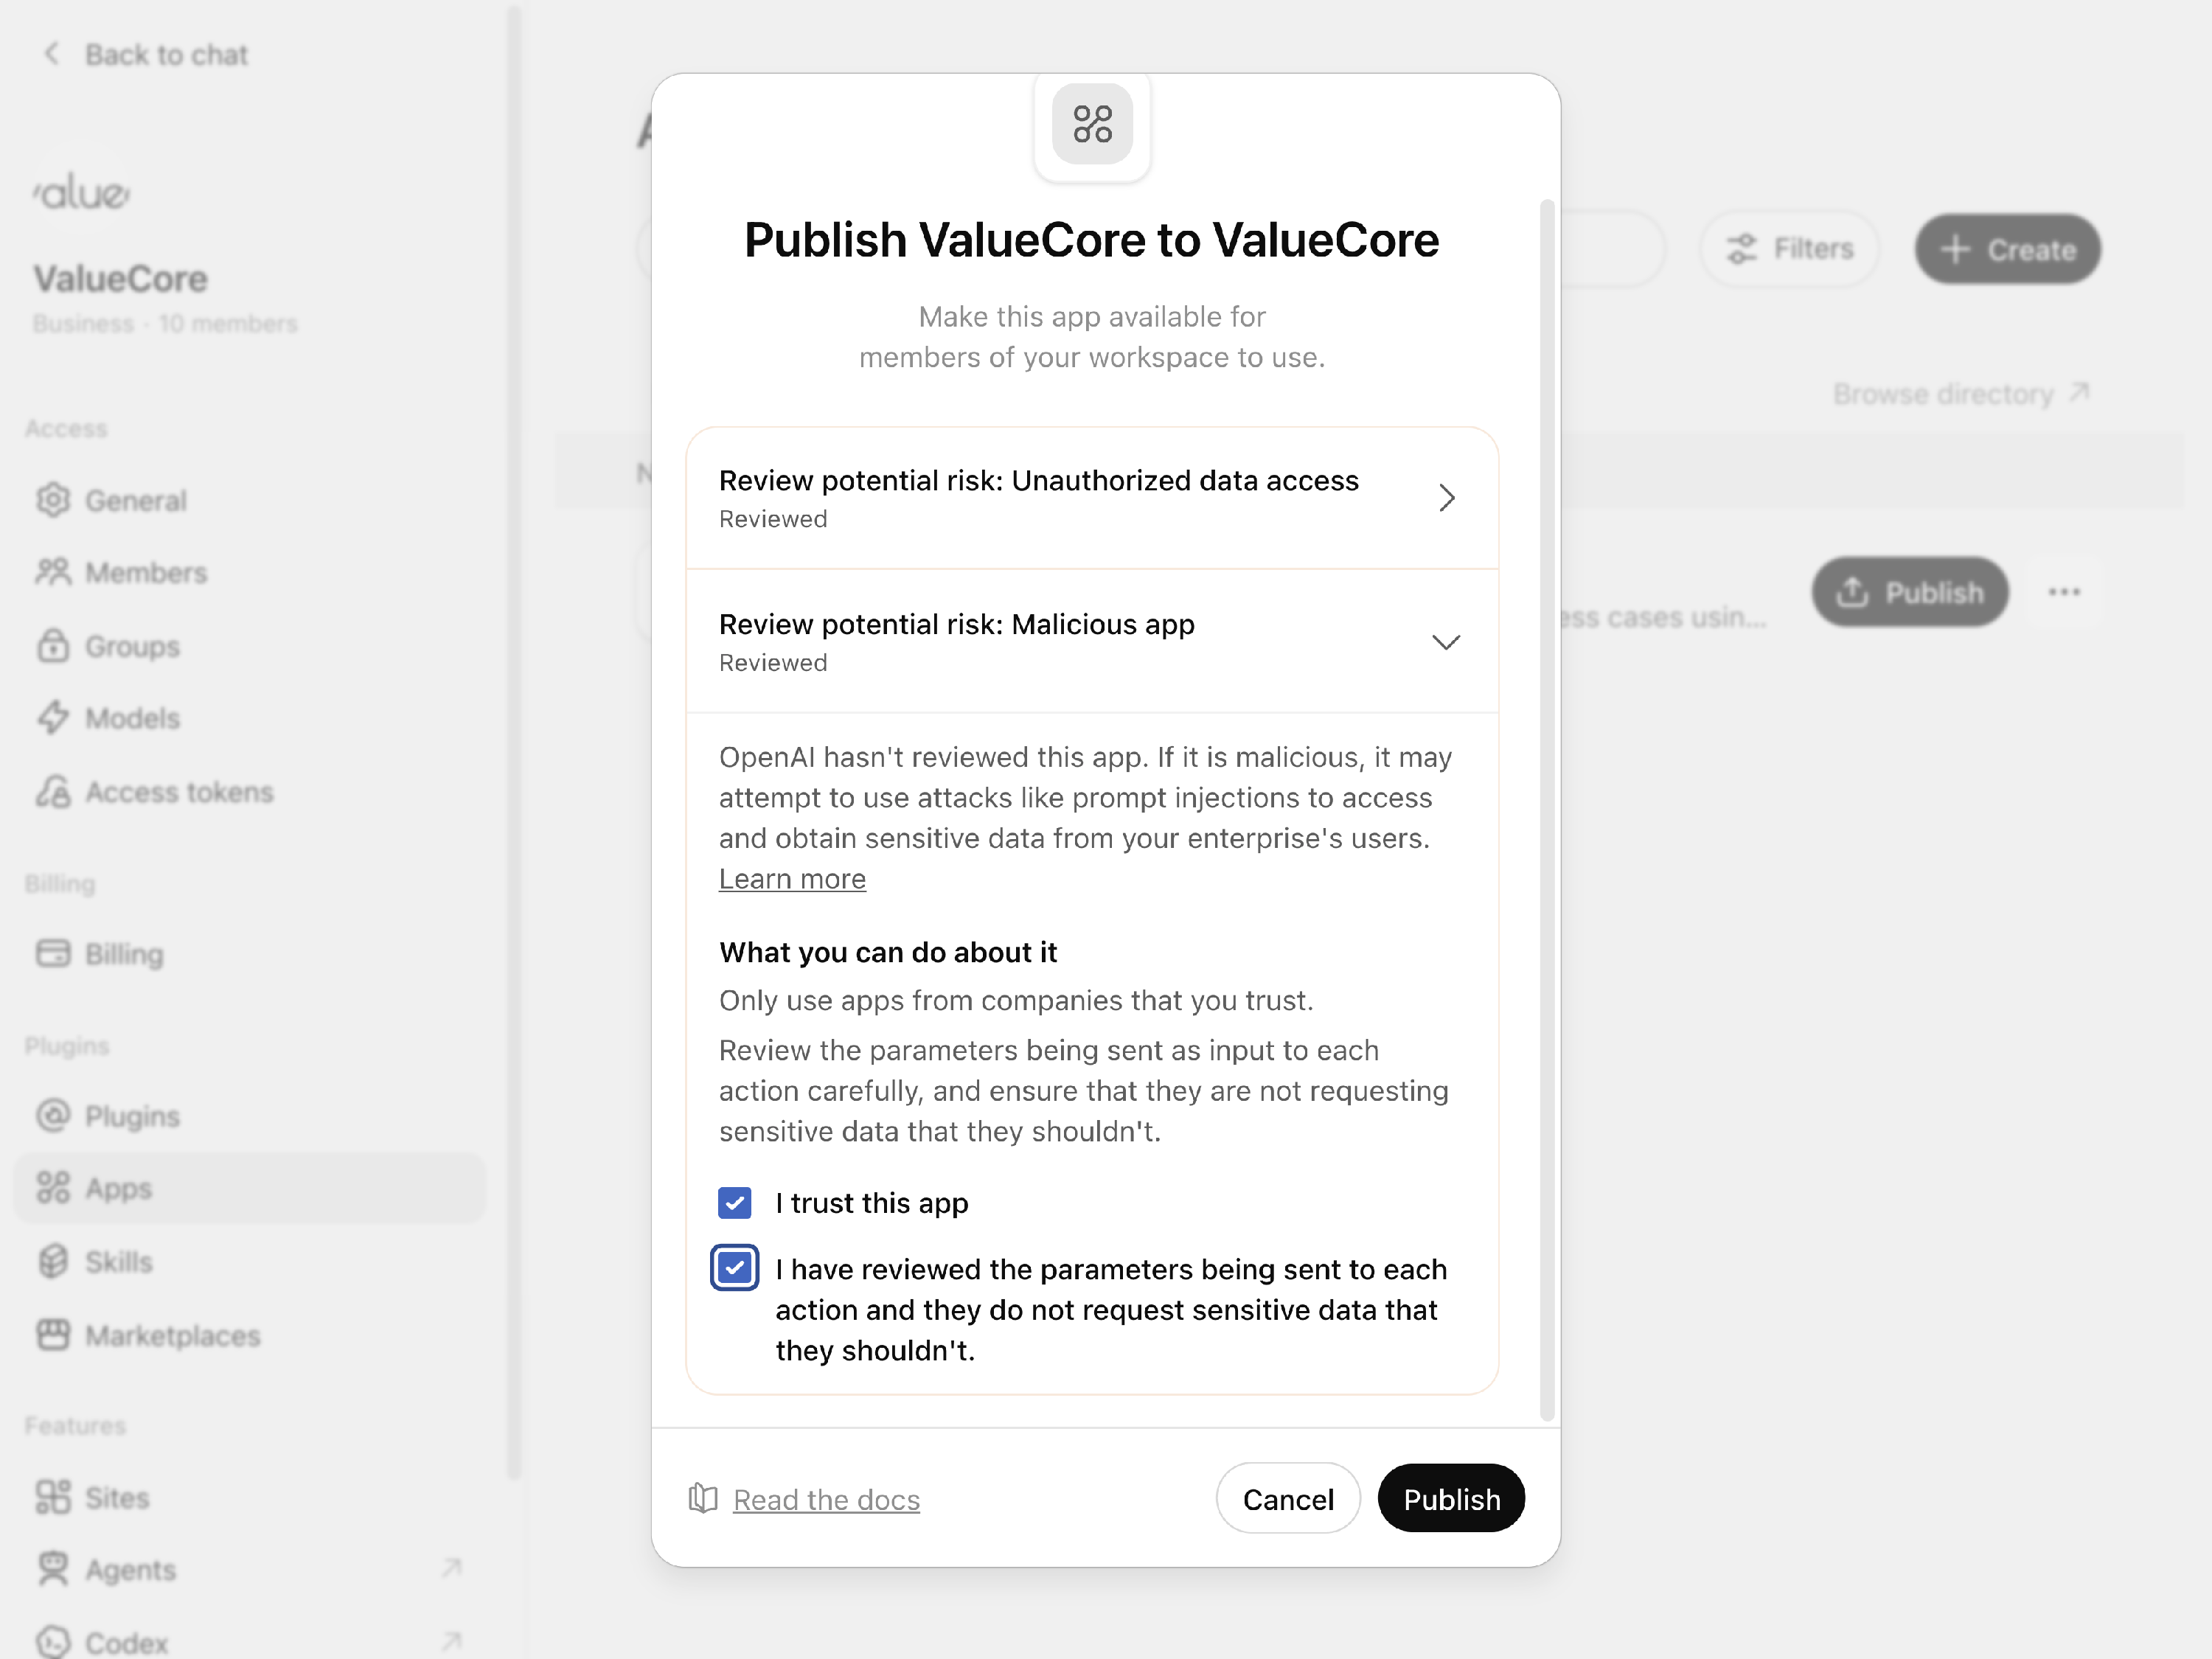
Figure 5. Company publication requires the administrator to complete both review sections.
9. Connect organization members
Select your company workspace and open the approved ValueCore entry. If your interface uses Apps, select Connect. If it uses Plugins, open Plugin actions > Manage and select Connect in the Connection section. Select Sign in with ValueCore and authorize your own account. Use the published entry rather than creating another app.
Step 7: Test each member identity
Start a new chat with ValueCore selected and complete the three checks in Verify your ValueCore connection. Have a second member repeat the process before broad rollout. Each connection must resolve to its intended ValueCore user.
10. Verify your ValueCore connection
Run these read-only checks after authorization and when reconnecting or changing accounts. Administrators testing a draft select it from the composer’s plus menu > Developer mode. Members select the published ValueCore app from the tools menu in their company workspace.
Check 1: Confirm who you are
Copy and send this prompt:
In ChatGPT, select the arrow beside the ValueCore tool call to expand its details. Open the output for whoami and compare the returned user and organization with your expected account. The assistant’s prose alone does not prove that a tool ran.
Prompt to send:
Use only the ValueCore whoami tool. Tell me my ValueCore user name and organization name. Do not create, update, share, or export anything.
Pass: The activity or tool details show whoami, and its result matches your expected ValueCore user and organization. Your assistant login and ValueCore identity may differ. If the wrong ValueCore account appears, reconnect before reading business data.
Check 2: List your visualizers
Prompt to send:
Use the ValueCore list_visualizers tool to list my recent visualizers. Show each name and its ValueCore link. Do not create or change anything.
Pass: The tool returns your own business cases, or completes successfully with an empty list. An empty list is valid when you own no matching visualizers. An authorization error, timeout, or answer without a tool call is not a successful check. If at least one result is returned, open one link and confirm it is the expected case. If the list is empty, continue to Check 3.
Check 3: Confirm available models
Prompt to send:
Use ValueCore get_instructions and list_visualizer_types. Summarize my organization’s instructions and list the business case models available to me. Do not create anything.
Pass: Both tools respond without an authentication error. Confirm that the models are appropriate for your organization. If no models are available, contact your ValueCore administrator.
Before company rollout
Have two intended members authorize separately and complete Checks 1 and 2. Each must receive their own expected ValueCore identity. A shared app definition does not provide access to everyone’s records. Save the test date and outcome without saving credentials.
11. Resolve access problems
App missing: Confirm the company workspace, published status, and permitted audience. An installed development app is not proof of company publication. If Apps > Drafts is empty after creation, check Plugins > ValueCore > Manage before retrying Create. Escalate an unavailable publication control to the workspace administrator or OpenAI support.
Authorization fails: Confirm the ValueCore identity and endpoint. Use the personal-token field on the ValueCore authorization page for ValueCore SSO. Do not substitute your ChatGPT password or an Organization API Key.
Wrong user or no records: Open ValueCore in Apps or Plugins. Open its connection settings (Plugin actions > Manage in the Plugins interface), select Disconnect for your personal connection, then Connect and sign in with the intended ValueCore account. Run whoami again. Disconnect your own connection; do not disable or delete the workspace app to change accounts. Existing visualizers remain scoped to the authenticated user.
Connection expires: Reauthorize through the app. Have support inspect the OAuth error if it recurs. Do not enter refresh-token settings that ValueCore has not provided, and never reuse another person’s token.
12. Ongoing administration
Record the workspace, connector endpoint, approved audience, and support owner. Review both ChatGPT and ValueCore access when a member leaves. App disconnection does not delete business cases or undo earlier changes. Report suspected token exposure to ValueCore support.
Contact support@valuecore.ai with the workspace plan, failing step, exact error, and time. Exclude passwords, tokens, and customer records. Menu labels may vary by rollout. Reviewed September 9, 2026.
Learn more: OpenAI administrator deployment reference